Showing posts with label Monitor. Show all posts

January 21, 2016

How to Install Zabbix Agent and Add Windows Host to Zabbix Monitoring – Part 3

Step 1: Download and Install Zabbix Agent on Windows

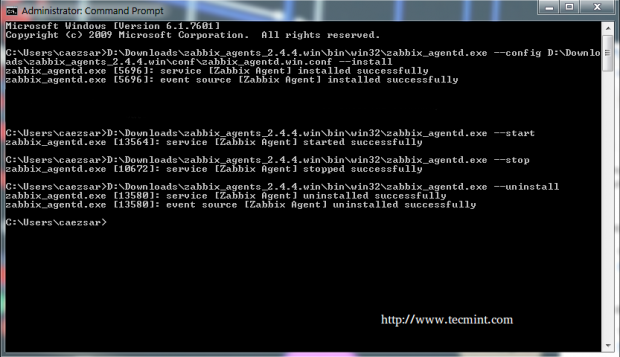
1. The pre-compiled zip agents for Windows environments can be obtained from official Zabbix download page and manually installed and started on the system using windows Command Prompt as in the following example:
C:\Users\caezsar><full system path to zabbix_agentd.exe> --config <full system path to zabbix_agentd.win.conf> --install
Example, suppose you’ve downloaded and extracted the Zabbix agent zip archive toD:\Downloads\zabbix_agents_2.4.4.win\, run the following command to install the service:
C:\Users\caezsar>D:\Downloads\zabbix_agents_2.4.4.win\bin\win32\zabbix_agentd.exe --config D:\Downloads\zabbix_agents_2.4.4.win\conf\zabbix_agentd.win.conf --install
2. After the service has been installed on your windows host, open zabbix_agentd.win.conf file and manually edit the following parameters:
zabbix_agentd.win.conf
Server=IP of Zabbix Server
ServerActive=IP of Zabbix Server
Hostname=use the FQDN of your windows host
3. To start the service just type:
C:\Users\caezsar>D:\Downloads\zabbix_agents_2.4.4.win\bin\win32\zabbix_agentd.exe --start
To stop the service run the same command as above with --stop argument and to uninstall the service use the --uninstall argument.
C:\Users\caezsar>D:\Downloads\zabbix_agents_2.4.4.win\bin\win32\zabbix_agentd.exe --stop
C:\Users\caezsar>D:\Downloads\zabbix_agents_2.4.4.win\bin\win32\zabbix_agentd.exe --uninstall
Configure Zabbix Windows Agent
4. A second and more convenient method to install and automatically configure Zabbix agent on Windows environments is by downloading Zabbix Agent installer msi package specific for your system architecture by visiting the link: http://www.suiviperf.com/zabbix/index.php.
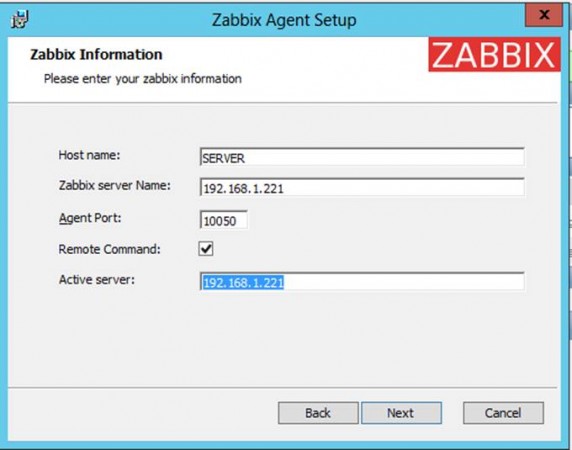
5. Once the Zabbix agent msi file has been downloaded on your system, run it and supply the required information in order to configure and install the agent on the target monitored host as it follows:
Hostname: use the FQDN of your windows host (the hostname value should match the “Full Computer name” configured for your machine)
Zabbix server Name: use the IP of the Zabbix Server
Agent Port: 10050 
Remote Command: check this value
Active Server: IP of Zabbix Server
Zabbix Agent Installation on Windows
If you need to modify Zabbix configuration file with other custom values at a later date, the conf file can be found on %programfiles%\Zabbix Agent\ path.
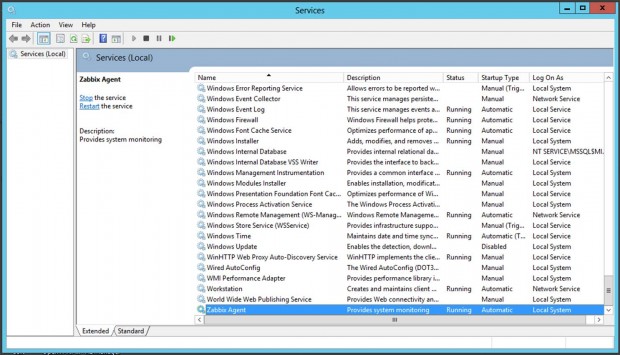
6. After you’ve finished the setup, open a windows Command Prompt with Administratorprivileges, run services.msc command in order to open Windows Services utility and locateZabbix Agent service to check if the service is running and automatically started after reboot.
services.msc
From this console you can manage the service (start, stop, pause, resume, enable or disable).
Zabbix Agent Windows Service

Step 2: Configure Windows Firewall and Test Zabbix Agent

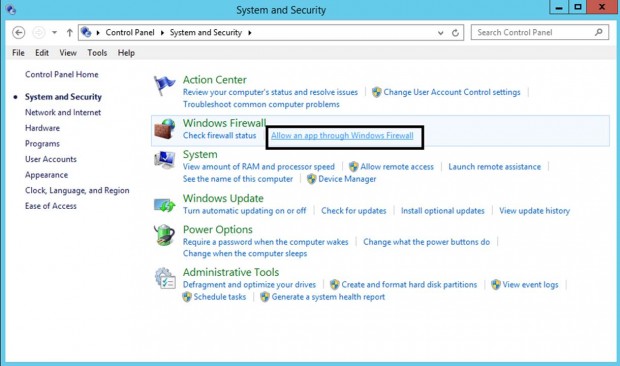
7. Almost all Windows based systems have Windows Firewall active and running, therefore zabbix agent port must be opened in firewall in order to communicate with zabbix server.
In order to open Zabbix agent port in windows firewall, open Control Panel -> System and Security– > Windows Firewall and hit on Allow an app through Windows Firewall.
Open Zabbix Port on Windows
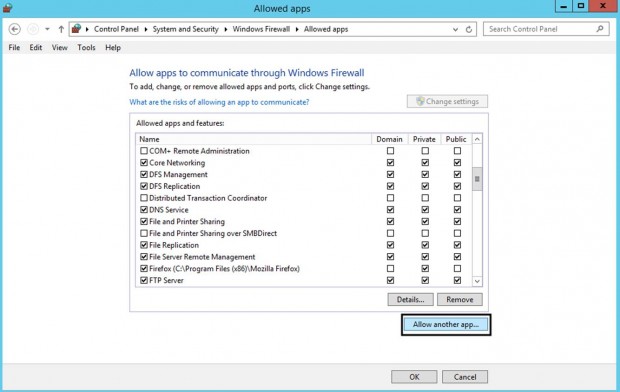
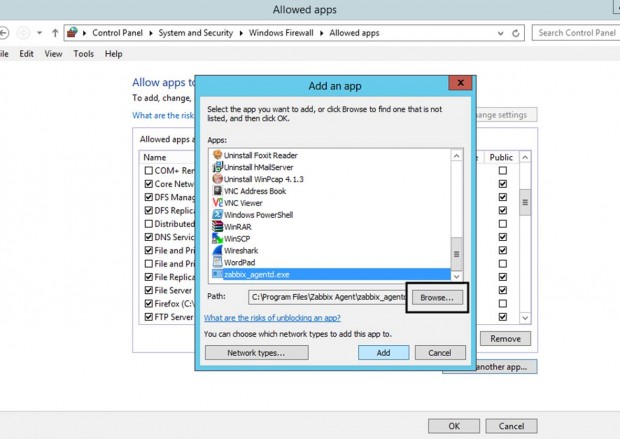
8. Next, click on Allow another app button and a new window should open. Use the Browse button to navigate and add Zabbix agent executable file (usually found in %programfiles%\Zabbix Agent\if you installed it using msi program), then hit on Add button to add the service.
Add Zabbix Agent
Add Zabbix Agent
Add Zabbix to Windows
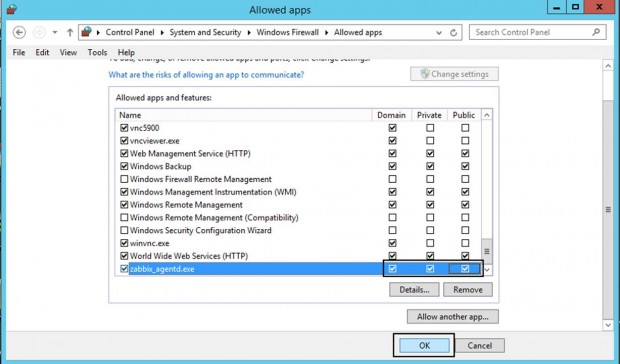
9. Next, make sure you check and open the firewall rule on the network segment where zabbix server is located in your network and hit OK button to finish and apply configuration.
Allow Zabbix Agent on Windows Firewall
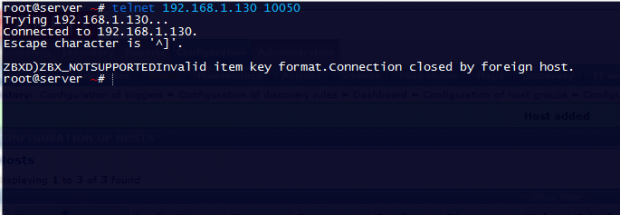
10. In order to test if Zabbix agent running on windows is reachable from Zabbix server side, usetelnet or netcat command on zabbix server against windows agent IP-Port and a Connected message should appear. Hit Enter key to generate an error message and automatically disconnect from agent:
telnet <Windows_agent IP Address> 10050
Check Zabbix Agent Port on Windows

Step 3: Add Zabbix Agent Monitored Windows Host to Zabbix Server

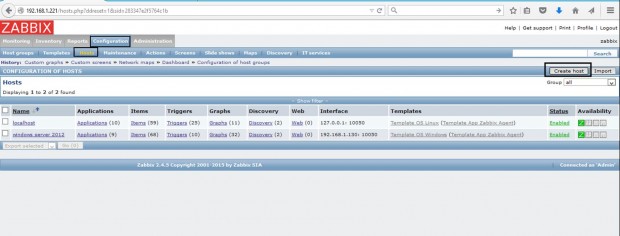
11. Once the windows agent has been tested from command line and everything looks fine, go toZabbix Server web interface, move to Configuration tab -> Hosts and hit on Create Host button in order to add the Windows monitored host.
Add Windows Host to Zabbix
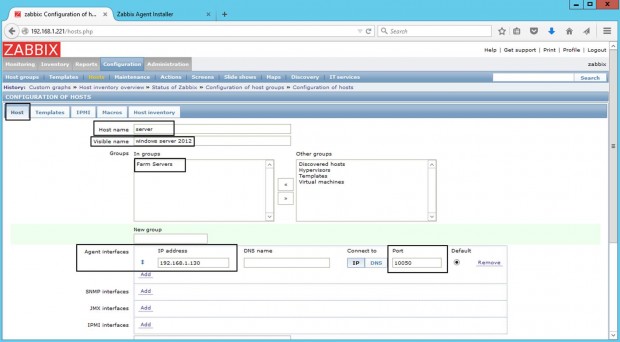
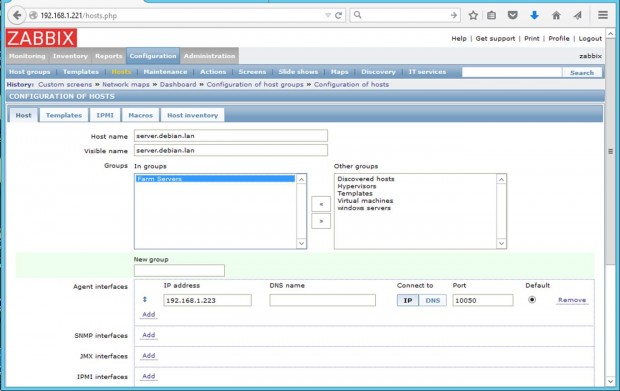
12. On Host window add the FQDN of your windows agent machine in Host name filed, add an arbitrary name to Visible name filed in order to easily identify the monitored machine on Zabbix panel, make sure the host is included into a Group Servers and add the IP Address of your windows host in Agent interfaces filed. The Port value leave it unchanged.
Windows Host Configuration in Zabbix
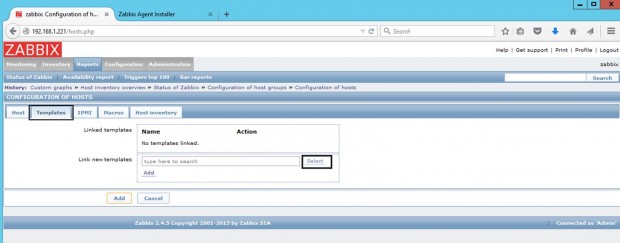
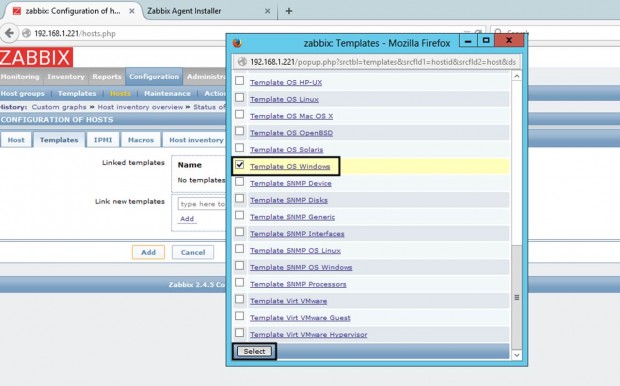
13. Next, go to Template tab and hit on Select button. A new window with Zabbix Templatesshould appear. Navigate through this window, check Template OS Windows and hit on Selectbutton to add the template.
Zabbix Template OS Windows
Select Template OS Windows
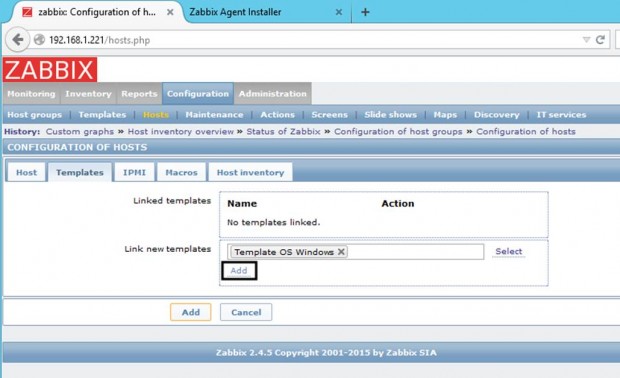
14. Once the Template OS Windows appears on Link new templates filed, hit on Add button in order to link this template to the windows host configuration.
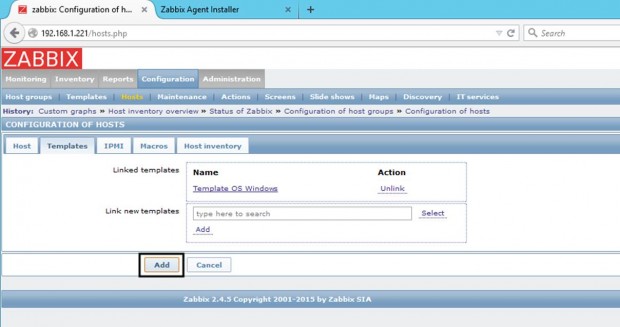
Finally, after the Template OS Windows is visible in Linked Templates filed hit on below Addbutton to complete the process and add the entire Windows host configuration.
Zabbix Linked Windows Templates
Add Linked Zabbix Windows Templates
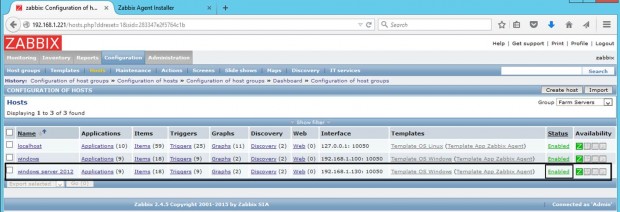
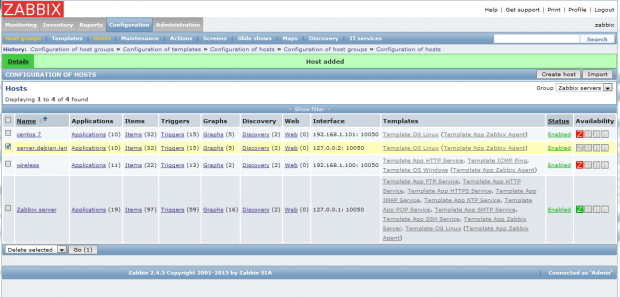
15. After your monitored windows machine has been added return to Configuration -> Hosts and the windows Host should now be present in this window as illustrated on below screenshot.
Check Windows Host in Zabbix
That’s all! Just assure that your windows host Status is set to Enabled and wait a few minutes in order for Zabbix server to contact the windows agent side and process the received remote data.
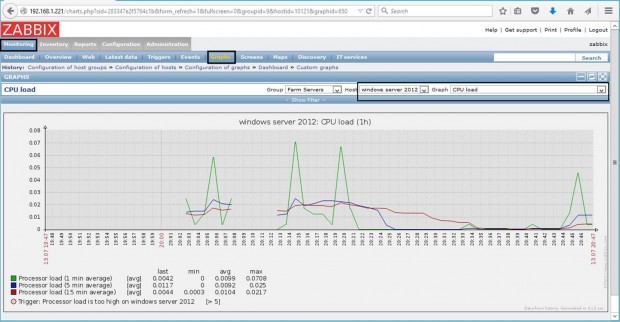
As an example, to get a graphical inside of the CPU load on the monitored Windows machine go to Zabbix web console Monitoring tab -> Graphs, select the windows machine host name and CPU load Graph and all the collected data so far should be presented into a nice graphical chart.
Monitor Windows Host in Zabbix

How to Install Zabbix Agent on CentOS/RHEL 7/6/5 - Part 2

Installing Zabbix Agent

Follow the below instructions to install Zabbix Agent on CentOS, RHEL 7/6/5 systems.

Step 1: Add Required Repository

Before installing Zabbix Agent first configure zabbix yum repository using following commands as per your required version and operating system.
CentOS/RHEL 7:
# rpm -Uvh http://repo.zabbix.com/zabbix/2.2/rhel/7/x86_64/zabbix-release-2.2-1.el7.noarch.rpm

CentOS/RHEL 6:
# rpm -Uvh http://repo.zabbix.com/zabbix/2.2/rhel/6/x86_64/zabbix-release-2.2-1.el6.noarch.rpm

CentOS/RHEL 5:
# rpm -Uvh http://repo.zabbix.com/zabbix/2.2/rhel/5/x86_64/zabbix-release-2.2-1.el5.noarch.rpm

Step 2: Install Zabbix Agent

After installing yum repository packages in our system. Now use following command to install Zabbix agent on your Linux sytem.
# yum install zabbix zabbix-agent

Step 3: Update Zabbix Agent Configuration

As zabbix agent has been successfully installed on our remote system. Now we just need to configure zabbix agent by adding zabbix server ip in its configuration file /etc/zabbix/zabbix_agentd.conf
#Server=[zabbix server ip]
#Hostname=[ Hostname of client system ]

Server=192.168.1.11
Hostname=Server1

Step 4: Restarting Zabbix Agent

After adding zabbix server ip in configuration file, now restart agent service using below command.
# /etc/init.d/zabbix-agent restart
To start and stop zabbix-agent service anytime use following commands.
# /etc/init.d/zabbix-agent start
# /etc/init.d/zabbix-agent stop

Step 5: Add Zabbix Agent Monitored Host to Zabbix Server

6. On the next step it’s time to move to Zabbix server web console and start adding the hosts which run zabbix agent in order to be monitored by the server.
Go to Configuration -> Hosts -> Create Host -> Host tab and fill the Host name field with the FQDN of the monitored zabbix agent machine, use the same value as above for Visible name field.
Next, add this host to a group of monitored servers and use the IP Address of the monitored machine at Agent interfaces field – alternatively you can also use DNS resolution if it’s the case. Use the below screenshots as a guide.
Add Linux Host to Zabbix Monitoring
Add Linux Host to Zabbix Host Group
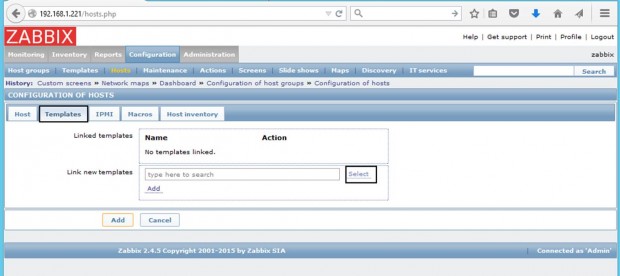
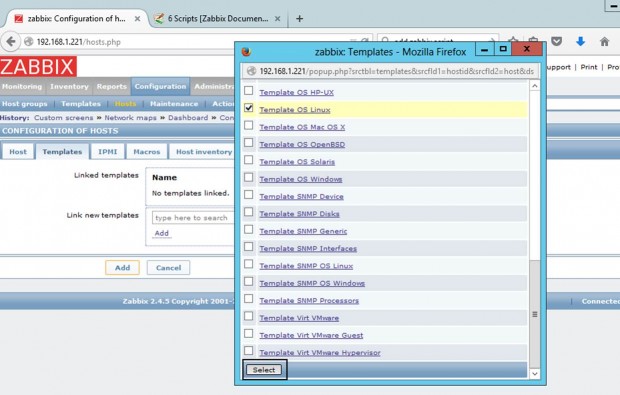
7. Next, move to Templates tab and hit Select. A new window with templates should open. ChooseTemplate OS Linux then scroll down and hit on Select button to add it and automatically close the window.
Add Zabbix Linux OS Template
Select Linux OS Template
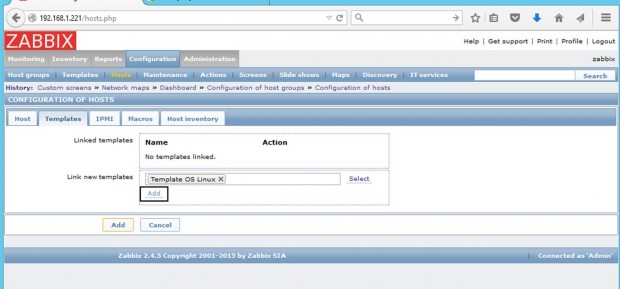
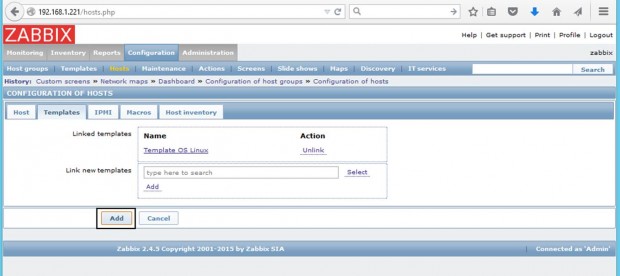
8. Once the template appears to Link new template box, hit on Add text to link it to zabbix server, then hit on the lower Add button to finish the process and completely add the monitored host. The visible name of the monitored host should now appear hosts window.
Link New Linux OS Template
Add Linux OS Template
Added Linux Host to Zabbix
That’s all! Just assure that the host Status is set to Enabled and wait a few minutes in order for Zabbix server to contact the agent, process the received data and inform or eventually alert you if something goes bad on the monitored target.

How to Install Zabbix LTS (Network Monitoring Tool) on CentOS, RedHat and Fedora - Part 1

Zabbix is an open source software for networks and application monitoring. Zabbix provides agents to monitor remote hosts as well as Zabbix includes support for monitoring via SNMP, TCP and ICMP checks. Click here to know more about zabbix.
Zabbix-Monitoring
This article will help you to step by step install Zabbix 2.2 Server on CentOS/RHEL 7/6/5 and Fedora Systems. Before starting installation read below basic requirements to run Zabbix 2.2.
  • Apache: 1.3.12 or later.
  • PHP: 5.3.0 or later.
  • MySQL: 5.03 or later.
  • OpenIPMI: Required for IPMI support.
  • libssh2: Required for SSH support. Version 1.0 or higher.
  • fping: Required for ICMP ping items.
  • libcurl: Required for web monitoring.
  • libiksemel: Required for Jabber support.
  • net-snmp: Required for SNMP support.

Step 1: Set Up Apache, MySQL and PHP

In order to use Zabbix we required a Web Server, database server and PHP to work. In this steps we are going to set up these services, You many skip this step if you have already configured it.
Install All Services
# yum install httpd httpd-devel 
# yum install mysql mysql-server 
# yum install php php-cli php-common php-devel php-pear php-gd php-mbstring php-mysql php-xml
Start All Services
# service httpd start
# service mysqld start
MySQL Initial Setup
Run following command to setup mysql initially and secure it
# mysql_secure_installation

Step 2: Configure Yum Repository

Before installing Zabbix first configure zabbixzone rpm repository in our system using following commands.
CentOS/RHEL 7:
# rpm -Uvh http://repo.zabbix.com/zabbix/2.2/rhel/7/x86_64/zabbix-release-2.2-1.el7.noarch.rpm

CentOS/RHEL 6:
# rpm -Uvh http://repo.zabbix.com/zabbix/2.2/rhel/6/x86_64/zabbix-release-2.2-1.el6.noarch.rpm

CentOS/RHEL 5:
# rpm -Uvh http://repo.zabbix.com/zabbix/2.2/rhel/5/x86_64/zabbix-release-2.2-1.el5.noarch.rpm

Step 3: Install Zabbix Server with MySQL

Use following command to install Zabbix using mysql database support packages on your system.
# yum install zabbix-server-mysql zabbix-web-mysql zabbix-agent zabbix-java-gateway

Step 4: Setup Zabbix Apache Configuration

Zabbix creates its own apache configuration file /etc/httpd/conf.d/zabbix.conf. Edit this file and just update timezone. More timezone’s
  php_value date.timezone Asia/Kolkata
After changing value restart Apache service.
# service httpd restart

Step 4: Create Zabbix MySQL Database

This installation is using mysql as backend of zabbix, So we need to create MySQL database and User for zabbix installation.
# mysql -u root -p

mysql> CREATE DATABASE zabbix CHARACTER SET UTF8;
mysql> GRANT ALL PRIVILEGES on zabbix.* to 'zabbix'@'localhost' IDENTIFIED BY 'SECRET_PASSWORD';
mysql> FLUSH PRIVILEGES;
mysql> quit
After creating database restore the default mysql database provided by zabbix. These files can be found at /usr/share/doc/zabbix-server-mysql-<version>/create/ directory.
# mysql -u zabbix -p zabbix < /usr/share/doc/zabbix-server-mysql-2.2.8/create/schema.sql
# mysql -u zabbix -p zabbix < /usr/share/doc/zabbix-server-mysql-2.2.8/create/images.sql
# mysql -u zabbix -p zabbix < /usr/share/doc/zabbix-server-mysql-2.2.8/create/data.sql

Step 5: Start Zabbix Server

After completing above setup, let’s start Zabbix server using following command.
# service zabbix-server start
After starting zabbix service, let’s go to Zabbix web installer and finish the installation.

Step 5: Start Zabbix Web Installer

Zabbix web installer can be access using following url, Change FQDN as per you setup.
  http://svr1.tecadmin.net/zabbix/
and follow the steps as per given screen shots below.
Zabbix Setup Welcome Screen
This is welcome screen of zabbix web installer. Go forward by click on nextbutton.
Zabbix installation step 1
Check for pre-requisities
Check if your system have all required packages, if everything is ok click next.
Zabbix installation step 2
Configure DB Connection
Enter database details created in Step #4 and click Test Connection. If database connection is correct, it will show ok message. After that click next.
Zabbix installation step 3
Zabbix Server Details
Zabbix installation step 4
Pre-Installation Summary
This step will show the summary you have entered previous steps, so simply click next.
Zabbix installation step 5
Install Zabbix
Zabbix installation step 6
Zabbix Login Screen
Login to Zabbix using below default credentials.
   Username:  Admin
   Password:  zabbix
Zabbix installation step 7
Congratulation! Your Zabbix setup has been completed.