
Solve:
#yum -y install phpmyadmin php-mbstring php-gettext
#service httpd restart
Enjoyed!

#wget http://dl.fedoraproject.org/pub/epel/7/x86_64/e/epel-release-7-5.noarch.rpm
#wget
http://rpms.famillecollet.com/enterprise/remi-release-7.rpm
#rpm -Uvh remi-release-7*.rpm epel-release-7*.rpm
|
|
#rpm -Uvh remi-release-7*.rpm
|
|
#rpm -Uvh remi-release-6*.rpm epel-release-6*.rpm
|
|
#rpm -Uvh remi-release-6*.rpm
|
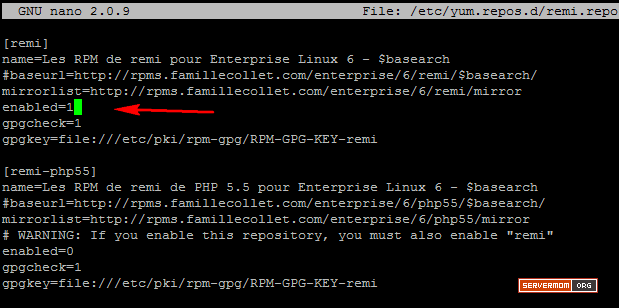
[remi]
name=Les RPM de remi pour Enterprise Linux 6 - $basearch
#baseurl=http://rpms.famillecollet.com/enterprise/6/remi/$basearch/
enabled=1
gpgcheck=1
|
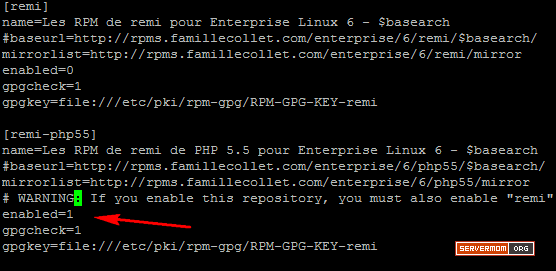
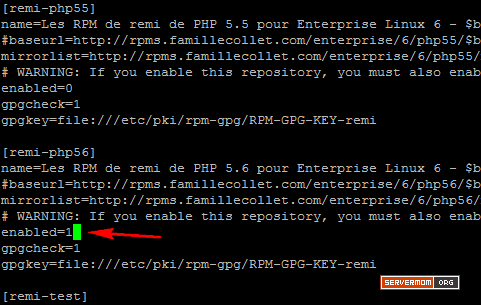
[remi-php56]
name=Les RPM de remi de PHP 5.6 pour Enterprise Linux 6 -
$basearch
#baseurl=http://rpms.famillecollet.com/enterprise/6/php56/$basearch/
# WARNING: If you enable this repository, you must also
enable "remi"
enabled=1
gpgcheck=1
|
#sudo yum -y install httpd mysql mysql-server mysql-devel
php php-mysql php-fpm
#service httpd restart
#php-v
Enjoyed!
|
[root@myserver ~]# cd /root
[root@myserver ~]# wget http://dl.fedoraproject.org/pub/epel...6-8.noarch.rpm
[root@myserver ~]# rpm -Uvh /root/epel-release-6-8.noarch.rpm
[root@myserver ~]# yum repolist
Loaded plugins: fastestmirror
Loading mirror speeds from cached hostfile
 * base: mirror.cisp.com
 * epel: mirror.metrocast.net
 * extras: mirror.symnds.com
 * updates: mirrors.easynews.com
repo id     repo name                status
base        CentOS-6 - Base           4,802
epel         Extra Packages for Enterprise Linux 6 - i386  8,318
extras      CentOS-6 - Extras         12
updates    CentOS-6 - Updates      93
repolist: 13,225
[root@myserver ~]# yum install syslog-ng syslog-ng-libdbi
Loaded plugins: fastestmirror
Loading mirror speeds from cached hostfile
 * base: mirror.cisp.com
 * epel: archive.linux.duke.edu
 * extras: mirror.symnds.com
 * updates: mirrors.easynews.com
Setting up Install Process
Resolving Dependencies
--> Running transaction check
---> Package syslog-ng.i686 0:3.2.5-3.el6 will be installed
--> Processing Dependency: libnet.so.1 for package: syslog-ng-3.2.5-3.el6.i686
--> Processing Dependency: libevtlog.so.0 for package: syslog-ng-3.2.5-3.el6.i686
---> Package syslog-ng-libdbi.i686 0:3.2.5-3.el6 will be installed
--> Processing Dependency: libdbi.so.0 for package: syslog-ng-libdbi-3.2.5-3.el6.i686
--> Running transaction check
---> Package eventlog.i686 0:0.2.12-1.el6 will be installed
---> Package libdbi.i686 0:0.8.3-4.el6 will be installed
---> Package libnet.i686 0:1.1.5-1.el6 will be installed
--> Finished Dependency Resolution

Dependencies Resolved

====================================================================================================
 Package                       Arch              Version                    Repository         Size
====================================================================================================
Installing:
 syslog-ng                     i686              3.2.5-3.el6                epel              442 k
 syslog-ng-libdbi              i686              3.2.5-3.el6                epel               31 k
Installing for dependencies:
 eventlog                      i686              0.2.12-1.el6               epel               17 k
 libdbi                        i686              0.8.3-4.el6                base               39 k
 libnet                        i686              1.1.5-1.el6                epel               55 k

Transaction Summary
====================================================================================================
Install       5 Package(s)

Total download size: 583 k
Installed size: 1.7 M
Is this ok [y/N]: y
warning: rpmts_HdrFromFdno: Header V3 RSA/SHA256 Signature, key ID 0608b895: NOKEY
Retrieving key from file:///etc/pki/rpm-gpg/RPM-GPG-KEY-EPEL-6
Importing GPG key 0x0608B895:
 Userid : EPEL (6)
 Package: epel-release-6-8.noarch (installed)
 From   : /etc/pki/rpm-gpg/RPM-GPG-KEY-EPEL-6
Is this ok [y/N]: y
[root@myserver ~]# chkconfig rsyslog off
[root@myserver ~]# chkconfig --list rsyslog
rsyslog        0:off 1:off 2:off 3:off 4:off 5:off
[root@myserver ~]# chkconfig syslog-ng on
[root@myserver ~]# chkconfig --list syslog-ng
syslog-ng            0:off 1:off 2:on 3:on 4:on
[root@myserver ~]# service rsyslog stop
Shutting down system logger:   [  OK  ]
[root@myserver ~]# service syslog-ng start
Starting syslog-ng:                  [  OK  ]
# test log
source s_device {
        udp(ip(0.0.0.0) port(514));
        tcp(ip(0.0.0.0) port(514));
};

destination d_device {
        file(
                "/var/log/syslog/$HOST-$YEAR$MONTH$DAY.log"
                perm(644)
                create_dirs(yes)
        );
};

log { source(s_ device); destination(d_ device); };
[root@myserver syslog-ng]# service syslog-ng restart
Stopping syslog-ng:                     [  OK  ]
Starting syslog-ng:                     [  OK  ]
wget http://dl.fedoraproject.org/pub/epel/6/i386/epel-release-6-8.noarch.rpm
wget http://rpms.famillecollet.com/enterprise/remi-release-6.rpm
rpm -Uvh remi-release-6*.rpm epel-release-6*.rpm
wget http://dl.fedoraproject.org/pub/epel/6/x86_64/epel-release-6-8.noarch.rpm
wget http://rpms.famillecollet.com/enterprise/remi-release-6.rpm
rpm -Uvh remi-release-6*.rpm epel-release-6*.rpm
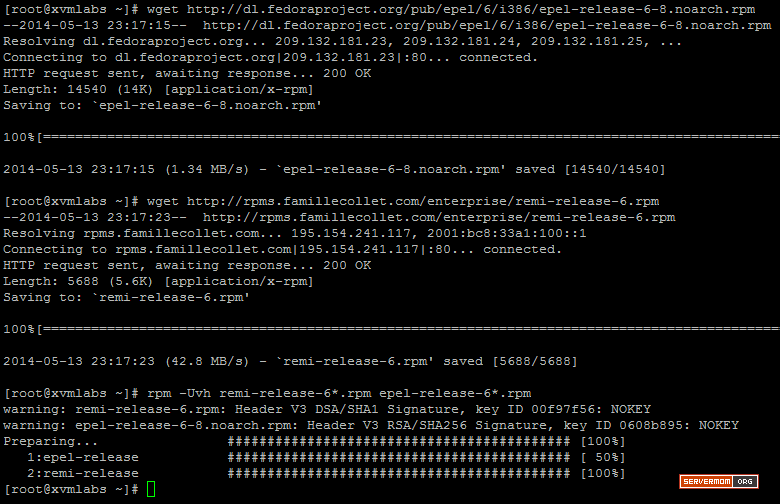
nano /etc/yum.repos.d/remi.repo
yum update -y

php -v


mv /etc/httpd/conf.d/php.conf /etc/httpd/conf.d/php.conf.bak
nano /etc/httpd/conf/httpd.conf
service httpd restart
mysql_upgrade -u root -p
source: http://www.servermom.org/upgrade-php-53-54-55-centos/1534/
# wget http://download.fedoraproject.org/pub/epel/6/x86_64/epel-release-6-8.noarch.rpm
# rpm -ivh epel-release-6-8.noarch.rpm
[root@core /]# yum listLoaded plugins: fastestmirrorDetermining fastest mirrorsError: Cannot retrieve metalink for repository: epel. Please verify its path and try again
sudo yum upgrade ca-certificates --disablerepo=epel
