Showing posts with label Windows. Show all posts

October 22, 2020

How to bulk export Tasks from Windows Task Scheduler

 Windows Task Scheduler holds all the tasks which were created by an application to periodically check for backup or etc. If you need to create the same task on another Windows Server/10 computer or need them back after reinstallation, there is away. Task Scheduler gives you an option to export them one by one but not all of them together. In this tutorial, I will tell you a trick on how you can bulk export Tasks from Windows Task Scheduler, and import it back to Windows.

All the Tasks created in Windows are available in a Task Folder. It is available in the Windows System Directory which in my case is C:\Windows\System32\Tasks.

1.Navigate to Tasks Folder. You will be prompted for admin permission.

2.Here you will see a couple of folders with some files inside it. They represent the same folder structure of the Task Scheduler and files too have the same name.

3.Copy the task files to the machine you want to export. You can also use it to back up your tasks in case your computer needs a reinstallation. It saves time as you don’t have to create them again.

4.Rename the files with extension as “.XML”. It is the same extension Task Scheduler uses when you export the tasks.

5.Once renamed, now use the Task Scheduler Import task feature to import them one by one. Windows will not recognize them if you drop them directly into the Tasks Folder of Windows.

It’s an excellent way to import and export tasks, especially if you want to run the same tasks on multiple PC. Also, it opens up the option to keep a copy of all the tasks when you are reinstalling Windows. All you need to do is copy it again, and it restores all the tasks.

April 29, 2020

February 25, 2020

January 22, 2016

[Solved] You might not have permission to use this network resource. Contact the administrator of this server to find out if you have access permissions.

[Window Title]
Open Folder

[Content]
\\192.168.1.12 is not accessible. You might not have permission to use this network resource. Contact the administrator of this server to find out if you have access permissions.

The referenced account is currently locked out and may not be logged on to.


[OK]

Solved:

Control Panel --> User Accounts --> Managed your credentials or Control Panel\Credential Manager\Windows Credentials


Select Windows credentials then remove account ==> DONE


Done!


January 7, 2016

How to Enable Windows 7 automatically installing drivers

Methods 1: Change device installation setting

  1. Click Start, type devices and printers in the search box, and then click Devices and Printers.


  2. All the devices connected to the computer are listed, including monitor, keyboard, mouse, printer, and so on.

    Under Devices, right-click the icon for the computer, and then click Device installation settings.


  3. A new window pops up asking you whether you want Windows to download driver software. 

    Click to select No, let me choose what to do, select Never install driver software from Windows update, and then click Save Changes.


  4. Click Yes when you are prompted for confirmation.


Methods 2: Configure group policy settings

Note This method only applies to Windows 7 Professional, Windows 7 Ultimate, and Windows 7 Enterprise.
  1. Click Start, type gpedit.msc in the search box, and then press ENTER. This step opens the Local Group Policy Editor.


    (Click Yes if you are prompted.)


  2. Expand Computer Configuration, expand Administrative Templates, expand System, expand Device Installation, and then click Device Installation Restrictions

    In the right window, double-click Prevent installation of devices not described by other policy settings


  3. Click to select Enabled, and then click OK.


  4. Restart the computer.

December 31, 2015

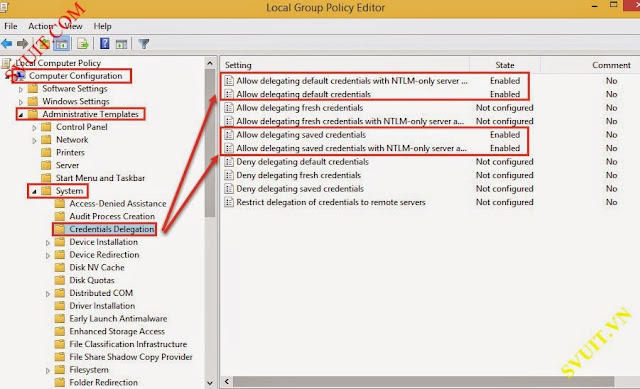
FIX lỗi your credentials did not work khi Remote Desktop

- Mặc dù ping được tới PC và remote vẫn cho, firewall đã tắt... đủ kiểu nhưng khi remote desktop thì dính ngay lỗi này 

your credentials did not work"


Cách fix như sau: 
- Trên PC chạy service Remote Desktop vào RUN và gõ gpedit.msc để sửa lỗi này


- CHỉnh các policy sau


- Các bạn enable lên và click vào "show" để điền giá trị "TERMSRV/*" vào 


- Sau đó các bạn gõ lệnh "gpupdate /force" để update lại policy nhé


- Và bây giờ remote lại thành công


nguồn http://svuit.vn/thread842.html

December 29, 2015

Cấu hình gởi log đến sysnlog-ng server trên windows và linux

Trong bài viết sau sẽ hướng dẫn các bạn cấu hình forward logs từ Windows & Linux đến syslog-ng server.

Trên hệ điều hành Linux

Sử dụng rsyslog.

Mở file rsyslog.conf và thêm dòng cấu hình sau vào cuối file cấu hình:

Code:
[root@test ~]# vim /etc/syslog.conf
 
#Configure syslog to Send Logs to a Remote Log Host
*.*                 @@192.168.1.11:514
Khởi động lại dịch vụ để các thay đổi được thực hiện
Code:
[root@test ~]# service syslog restart
Shutting down kernel logger:          [  OK  ]
Shutting down system logger:          [  OK  ]
Starting system logger:               [  OK  ]
Starting kernel logger:               [  OK  ]
Sử dụng syslog-ng.

Mở file cấu hình syslog-ng.conf, xóa toàn bộ nội dung bên trong file này và thêm vào phần cấu hình bên dưới.
Code:
[root@test ~]# vim /etc/syslog-ng/syslog-ng.conf
 
@version:3.2
 
# syslog-ng configuration file.
#
# This should behave pretty much like the original syslog on RedHat. But
# it could be configured a lot smarter.
#
# See syslog-ng(8) and syslog-ng.conf(5) for more information.
#
 
options {
        flush_lines (0);
        time_reopen (10);
        log_fifo_size (1000);
        long_hostnames (off);
        use_dns (no);
        use_fqdn (no);
        create_dirs (no);
        keep_hostname (yes);
};
 
source s_sys {
        file ("/proc/kmsg" program_override("kernel: "));
        unix-stream ("/dev/log");
        internal();
        # udp(ip(0.0.0.0) port(514));
};
 
destination syslog-ng_server {
        tcp("192.168.2.11" port(514));
        #udp("192.168.2.11" port(514));
};
 
log { source(s_sys); destination(syslog-ng_server); };
Lưu ý: Trong file cấu hình trên server sẽ gởi log đến remote server bằng giao thức tcp. Nếu muốn dùng giao thức udp thay cho giao thức tcp chúng ta cần sửa phần cấu hình destination syslog-ng_server thành
Code:
destination syslog-ng_server {
        #tcp("192.168.2.11" port(514));
        udp("192.168.2.11" port(514));
};
Khởi động lại dịch vụ để các thay đổi được thực hiện
Code:
[root@test ~]# service syslog-ng restart
Stopping syslog-ng:                                        [  OK  ]
Starting syslog-ng:                                        [  OK  ]
Kiểm tra ghi log

Chạy lệnh bên dưới để kiểm tra việc ghi log đến server syslog-ng trung tâm.
Code:
[root@test ~]# logger –t “message test”
Trên server log trung tâm chạy lênh sau để kiểm tra quá trình ghi log có thành công hay không. Nếu không thì kiểm tra lại kết nối mạng và cấu hình tường lửa.
Code:
[root@myserver syslog-ng]#  cat /var/log/device/{log_name}.log
Trên hệ điều hành windows.

Download ứng dụng Evtsys theo link sau.
http://shink.in/7yRdX
Sau khi download file, chúng ta tiến hành giải nén.
Mở command line và di chuyển vào thư mục file được giải nén, chạy lệnh sau.
Code:
Cú pháp: evtsys.exe -i -h [syslog server] -p [port]
C:\>evtsys.exe -i -h 192.168.2.11 -p 514
Tham khảo thêm phần cấu hình Syslog-ng theo link sauhttp://svuit.com/showthread.php?718-...3%AAn-CentOS-6

November 16, 2015

Cách bỏ nền xanh cho Icon ở Desktop Windows XP

Cách bỏ nền xanh cho Icon ở Desktop - Image 1
Do có nhìu bạn thắc mắc hỏi, ko biết tại sao, các icon ở Desktop (ngoài màn hình máy tính) cứ bị có nền màu xanh, nhìn rất xấu. Muốn bỏ đi mà không biết làm sao để bỏ được
Để khắc phục cái lỗi này, các bạn làm theo hướng dẫn sau
Click chuột phải vào màn hình Desktop chọn Property --> Tab Dektop --> Customize Desktop --> Tab Web -> Tích chuột bỏ Lock desktop item đi là dc.
Hoặc Chuột phải vào My computer, chọn properties. Sang tag advanced, nhấn settings trong khungperformance, hộp thoại Performance Options xuất hiện, trong tag Visual Effect, check vào mục use drop shadows for icon labels he desktop
Vậy là xong, các icon ở ngoài màn hình Desktop của bạn không còn bị màu xanh nữa.
Chúc các bạn thành công

November 13, 2015

Configure your DOS Window

Make your DOS windows large and do cut and paste easier.

Here we review DOS window settings that will help you to work faster.

  1. Customizing DOS Window Settings starts by right clicking the Start Menu
  2. Type in cmd and hit Enterscreenshot
  3. To get to your DOS window faster, you can pin it to your task bar. Right click the task bar CMD window icon and select Pin this program to taskbarscreenshot
  4. On the DOS window title bar, Right click and select the Defaults menu itemscreenshot
  5. Select the Quick Edit Mode setting. This allows you to highlight text in the window easily.screenshot
  6. In the Font tab, select a slimmer TrueType font, like Consolas or Lucida Console, and set the font size to 10screenshot
  7. In the Layout tab, change the Window Size to 132 columns and 56 rowsscreenshot
  8. Click OK to save. The next DOS window you open will appear with your customized settings.

reference: http://www.candelatech.com/cookbook.php?vol=misc&book=Custom+DOS+Window+Settings

October 24, 2015

Các cách kiểm tra các Process đang chạy trong windows

Khi bật Task Manager lên, các bạn thấy có rất nhiều process nhưng phân biệt được process nào là của chương trình nào!
Mình xin hướng dẫn các bạn một phương pháp đơn giản để kiểm tra:
- Mở CMD
- gõ vào: 
WMIC /OUTPUT:C:\ProcessList.txt PROCESS get Caption,Commandline,Processid

hoặc:

WMIC /OUTPUT:C:\ProcessList.txt path win32_process get Caption,Processid,Commandline 
Các bạn có thể copy đoạn code trên và paste vào notepad.Lưu lại với tên Getprocess.bat sau đó kích đúp vào!
-Mở C:\ProcessList.txt, các bạn sẽ thấy rõ đường dẫn của từng Process đang chạy!
p/s: Biện pháp trên áp dụng khi bạn ko có các chương trình chuyên dụng như: Process XP,Autoruns,...IceSword...

 hoặc dùng Process Explorer để quản lí Process cũng tốt lắm
http://technet.microsoft.com/en-us/s.../bb896653.aspx

nguồn: nhatnghe.com/forum

October 17, 2015

Hướng dẫn kiểm tra ứng dụng sử dụng cổng 80 trên Windows

Đôi lúc bạn muốn start ứng dụng sử dụng Apache, Jetty hoặc mở ứng dụng port 80 nhưng không thể start được vì 1 lý do đơn giản là cổng 80 đang được sử dụng bởi các ứng dụng khác. Bài viết này tôi sẽ hướng dẫn các bạn kiểm tra ứng dụng nào đang sử dụng cổng 80 trên Windows. Để có thể chạy được Apache (sử dụng Xampp, …)
Thường thì các ứng dụng sau sử dụng cổng 80 trên Windows:
  1. Skype
  2. IIS
  3. IIS Admin Service
  4. World Wide Web Publishing service
  5. SQL Server Reporting services
  6. Web Deployment Agent Service
  7. HTTP Server API
Việc làm đơn giản là hãy stop hết các ứng dụng, services đó đi ! Dưới đây là hướng dẫn cơ bản cách kiểm tra và stop ứng dụng đang hoặc mặc định sử dụng cổng 80.

1: Skype

Đối với Skype, bạn chỉ cần thoát ứng dụng là ok, hoặc thay đổi tùy chỉnh Skype: Tools > Options > Advanced > Connection: Bỏ check “Use port 80 …” đi

2: IIS

Hãy Stop IIS hoặc gỡ nó đi nếu không sử dụng 😀

3: Services

Mở trình quản lý services, mở cửa sổ run, gõ lệnh:
1
services.msc
Stop các services sau:
  1. World Wide Web Publishing service
  2. SQL Server Reporting services
  3. Web Deployment Agent Service

4: HTTP Api Service

Đây là service cho phép các ứng dụng liên lạc với nhau thông qua HTTP mà không cần sử dụng IIS – Microsoft Internet Information Server. Các ứng dụng có thể đăng ký để nhận hoặc gửi các http request.
Sử dụng lệnh sau trên CMD – Command Prompt
1
net stop http

5: Netstat

Trường hợp, không rơi vào các trường hợp trên (tức là vẫn không khởi chạy được apache2), hãy sử dụng lệnh netstat để kiểm tra các ứng dụng, services đang mở cổng 80 giao thức tcp.
Mở CMD với quyền Administrator, gõ lệnh sau:
1
netstat -abno -p tcp
Hoặc thêm lệnh find để giới hạn kết quả tìm kiếm
1
netstat -abno -p tcp | find "80"
Bạn sẽ thấy một danh sách các ứng dụng đang nghe trên các cổng tcp, tương ứng với process id. Hãy sử dụng Task Manager để kill ứng dụng có process id tương ứng.
netstat -abno -p tcp
Note: Để thấy được process id trên Task Manager (tab: Processes), chọn: Views > Select columns > PID (Process Identifier)
pid-task-manager
Chúc bạn thành công !

Thiết lập DNS Google trong Windows bằng command line

Vì 1 lý do gì đó mà trong windows của bạn không thể thiết lập IP, DHCP, DNS trên giao diện, như hình dưới đây:

Thay vì tương tác trên giao diện bạn có thể cấu hình thiết lập DNS Google bằng chương trình dòng lệnh CMD bằng 2 bước sau:

1. Tìm tên mạng để cấu hình

Các tên giao diện mạng có thể là “Ethernet” hoặc “Wi-Fi” tùy vào máy của bạn. Sử dụng lệnh sau đây để liệt kê chúng ra
1
netsh interface show interface
Tên của mạng được thấy trong cột “Interface Name”

2. Cấu hình DNS Google

Chú ý chạy Command Prompt với quyền Administrator nhé
Ví dụ thiết lập DNS 8.8.8.8 của Google làm primary DNS: Sử dụng index=1
1
netsh interface ipv4 add dnsserver "Ethernet" address=8.8.8.8 index=1
Và dns 8.8.4.4 làm Secondary DNS: Sử dụng index=2
1
netsh interface ipv4 add dnsserver "Ethernet" address=8.8.4.4 index=2
Done.

Liên kết tham khảo

https://technet.microsoft.com/en-us/library/cc785383.aspx
http://stackoverflow.com/a/18626717/1896897