Showing posts with label Windows Server. Show all posts

April 19, 2017

join domain tự động nhiều máy tính vào domain từ xa


Yêu cầu:
- Server 2003 trở lên đã lên DC
- Máy client phải trỏ DNS đến DC (tốt nhất là cấu hình qua DHCP)
- Tất cả máy client phải enable local admin, password giống nhau

Thao tác trên DC:
- Tạo file computers.txt nội dung mỗi dòng là tên các máy client (có thể thay thế bằng IP).


- Tạo file .bat với nội dung sau:
Code:
FOR /f %%i in (C:\Computers.txt) DO (netdom join %%i /d:local.com /uo:administrator /po:abc123 /ud:local\administrator /pd:P@ssword /reboot)
pause
Giải thích thông số:
C:\Computers.txt: đường dẫn đến file computers.txt
/d: tên domain
/uo: admin local của máy client
/po: password admin local của máy client
/ud: domain admin
/pd: password domain admin
/reboot: khởi động lại máy client

- Chạy file .bat vừa tạo

[​IMG]

Sưu tầm

October 20, 2016

Windows Deployment Services (WDS) trên Windows Server 2008

Windows Deployment Services (WDS) là dịch vụ tích hợp trong Windows Server 2008 cho  phép cái đặt hệ điều hành từ xa cho các máy Client thông qua môi trường mạng . Trong bài viết này, tôi sẽ hướng dẫn bạn cách cài đặt và cấu hình Windows Deployment Services
Bài viết gồm các bước
  1. Cài đặt và cấu hình DHCP Server
  2. Cài đặt Windows Deployment Services
  3. Cấu hình Windows Deployment Server
  4. Cấu hình Boot Image và Install Image
  5. Cấu hình máy client và kiểm tra kết quả

Chuẩn bị

  • Máy DC: Windows Server 2008 đã nâng cấp Domain Controlle
  • Máy Client(máy ảo): chưa cài hệ điều hành

Thực hiện

1. Cài đặt và cấu hình DHCP Server
  • Tại máy Domain Controller, log on Administrator
  • Mở Server Manager từ Administrative Tools, chuột phải Roles chọn Add Roles
  • Trong cửa sổ Before You Begin, chọn Next
  • Cửa sổ Select Server Roles, đánh dấu chọn vào ô DHCP Server, chọn Next
135
  • Cửa sổ DHCP Server, chọn Next
  • Cửa sổ Select Network Connection Bindings, kiểm tra có đánh dấu chọn vào địa chỉ IP hiện thời của máy DC, chọn Next
136
  • Cửa sổ Specify IPv4 DNS Server Settings, để nguyên cấu hình mặc định, chọn Next
137
  • Cửa sổ Specify IPv4 WINS Server Settings, chọn WINS is not required for applications on this network, chọn Next
  • Cửa sổ Add or Edit DHCP Scopes , chọn Add . cấu hình thông số TCP/IP như trong hình, chọn OK
138
  • Cửa sổ Configure DHCPv6 Stateless Mode, chọn Disable DHCP stateless mode for this server, chọn Next
  • Cửa sổ Authorize DHC Server, giữ mặc định, chọn Next
139
  • Cửa sổ Confirm Installation Selections, chọn Install
140
  • Mở DHCP từ Administrative Tools, kiểm tra đã cài đặt và cấu hình thành công DHCP Server
141
2.Cài đặt Windows Deployment Services
  • Mở Server Manager từ Administrative Tools, chuột phải Roles chọn Add Roles
142
  • Cửa sổ Seclect Roles Services, đánh dấu chọn vào cả 2 ô Deployment Server và Transport Server, chọn Next
143
  • Cửa sổ Confirm Installation Selections, chọn Install
144
  • Cửa sổ Installation Results, chọn Close
145
  • Kiểm tra đã cài đặt thành công Windows Deployment Services
146
3 .Cấu hình Windows Deployment Server
  • Mở Windows Deployment Services từ Administrative Tools. Bung Server, chuột phải WDS server (luanpm.adminvietnam.org) chọn Configure Server
147
  • Trong cửa sổ Welcome Page, chọn Next
  • Cửa sổ Remote Installation Folder Location, giữ nguyên cấu hình mặc định, chọn Next
148
  • Trong hộp thoại System Volume Warning, chọn Yes
  • Cửa sổ DHCP Option 60 , chọn như hình
149
  • Cửa sổ PXE Server Initial Settings, chọn Do not respond to any client computer, chọn Finish
  • 150
  • Sau khi tiến trình cấu hình hoàn tất. Cửa sổ Configuration Complete, bỏ trắng ô chọn Add images to the Windows Deployment Server now, chọn Finish
151
  • Kiểm tra cấu hình thành công Windows Deployments Server
152
4. Cấu hình Boot Image và Install Image
  • Tạo Folder C:\Win7x86 chép source cài đặt windows 7 vào
153
  • Mở Windows Deployment Services từ Administrative Tools, bung Server, bung WDS server (luanpm.adminvietnam.org), chuột phải Boot Image, chọn Add Boot Image
  • Trong cửa sổ Image File, chọn Browse, trõ đường dẫn đến C:\Win7x86\source\boot.wim chọn Next
154
  • Cửa sổ Image Metadata, sửa tên như hình, chọn Next
155
  • Cửa sổ Summary, chọn Next
  • Sau khi hoàn tất quá trình add boot image, cửa sổ Task Progress chọn Finish
156
  • Kiểm tra đã add thành công Boot Image 157
  • Trong cửa sổ Windows Deployment Services, chuột phải Install Image, chọn Add Install Image
  • Cửa sổ Image Group, giữ nguyên cấu hình mặc định, chọn Next
158
  • Cửa sổ Image File, chọn Browse, trõ đường dẫn đến C:\Win7x86\source\install.wim, chọn Next
159
  • Cửa sổ Lists of Available Images, đánh dấu chọn phiên bản windows muốn cài
160
  • Cửa sổ Summary chọn Next
  • Sau khi tiến trình add image hoàn tất, cửa sổ Task Progress, chọn Finish
161
  • Kiểm tra đã add thành công Install Image
162
6.Cấu hình Client và kiểm tra kết quả
  • Mở Microsoft Virtual PC, khởi động máy ảo
  • Trong quá trình khởi động, nhấn phím F2, chỉnh BIOS chuyển qua chế độ boot từ card mạng
163
  • Khi nhận được yêu cầu “Press F12 for network service boot”, nhấn phím F12
164
  • Máy client kết nối tới WDS server và bắt đầu quá trình cài đặt Windows
165
  • Giao diện cài đặt Windows , chọn Next
166
  • Cửa sổ xác thực , nhập vào adminvietnam\administrator
168
169
LuanPM – Adminvietnam.org
http://www.slideshare.net/laonap166/windows-deployment-services-wds-trn-windows-server-2008

October 14, 2016

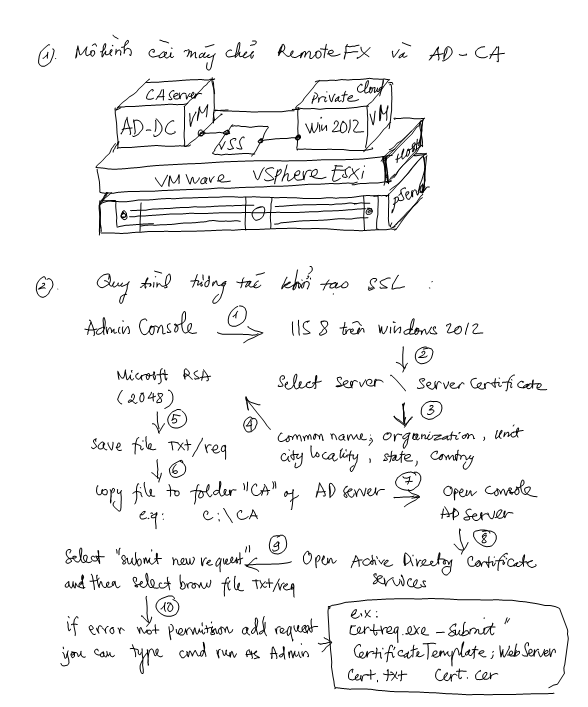
Cấu hình CA cho SSL trên máy chủ RemoteFX


image
image
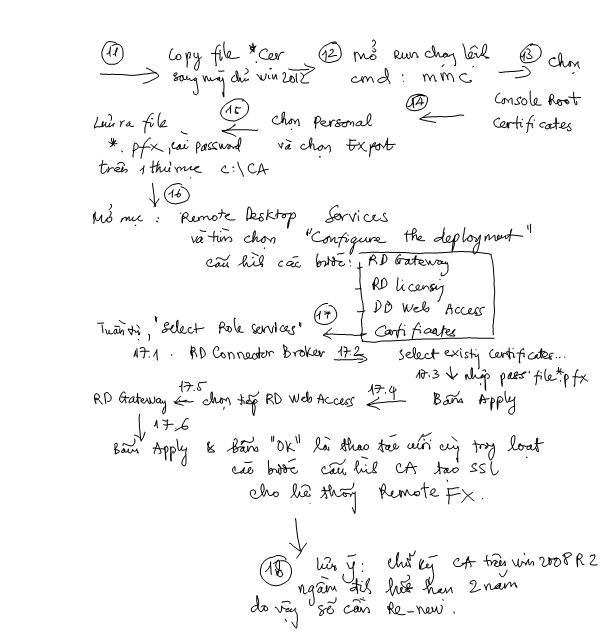
2. Các bước thực hiện:
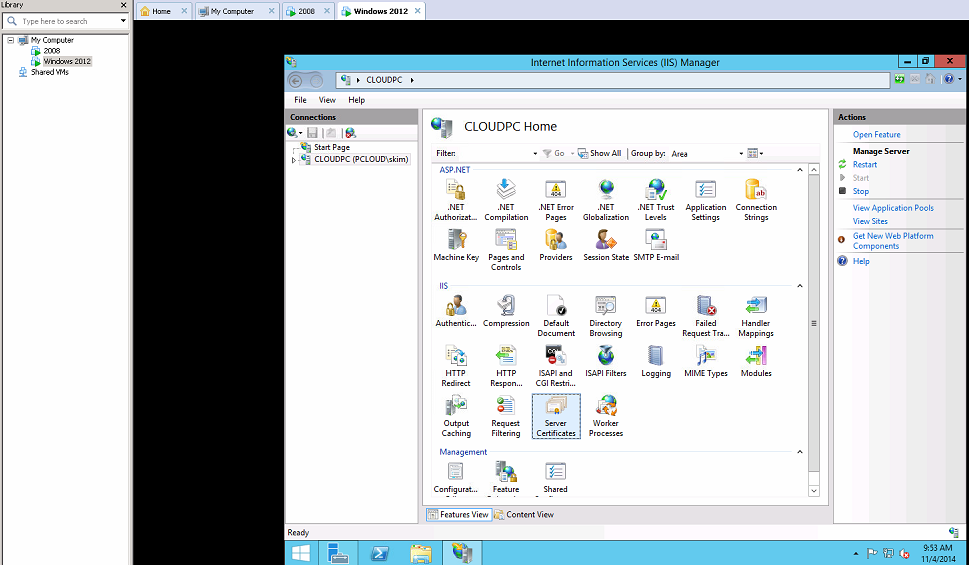
Bước 1. IIS 8
image
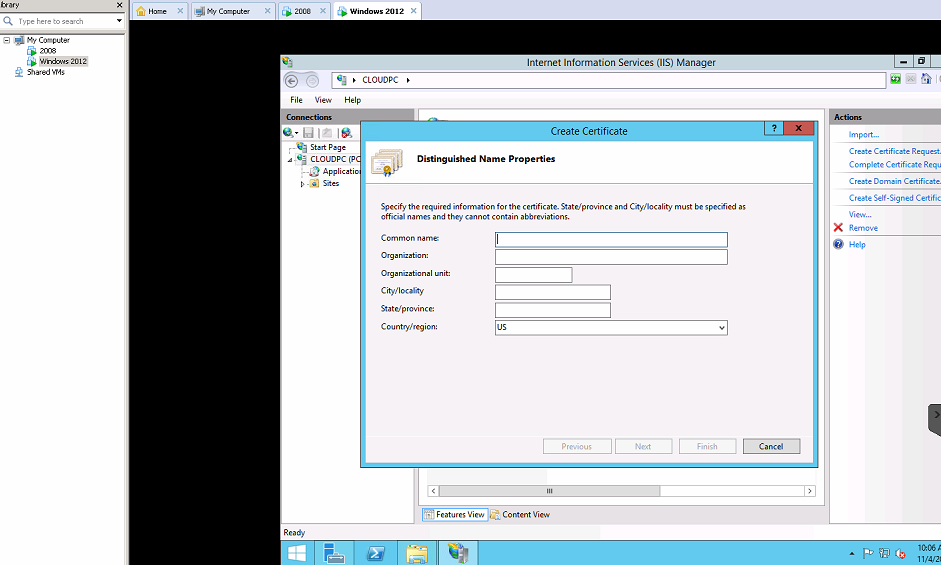
Bước 2.  Cấu hình Common name
image
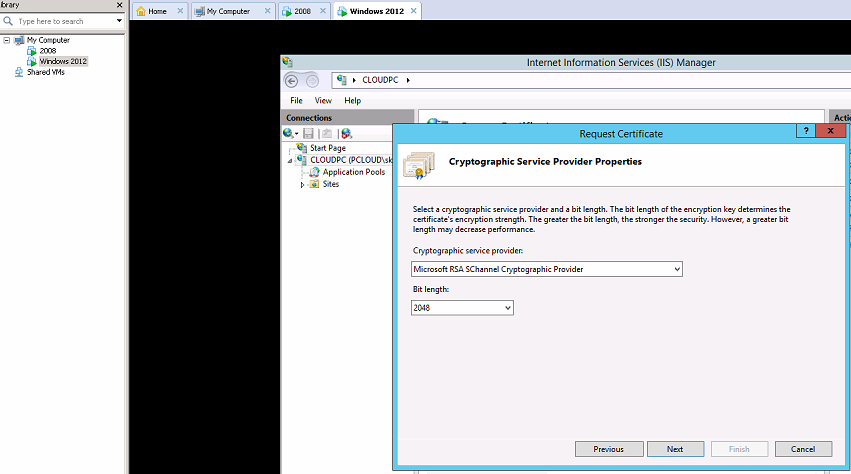
Bước 3.  Cấu hình mã hóa RSA
image
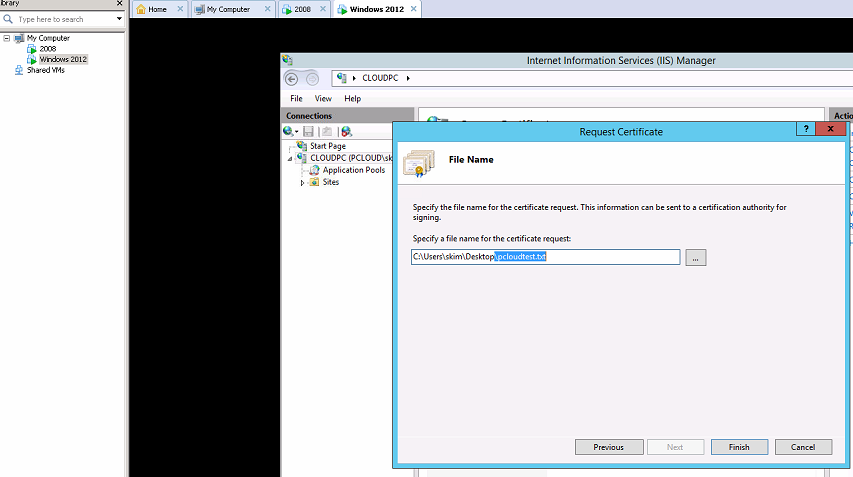
Bước 4. Lưu fie txt hoặc req
image
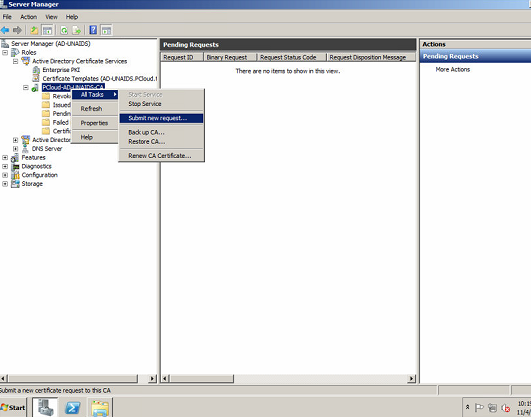
Bước 5. Mở Server Manager trên máy chủ AD Server 2008 R2
image
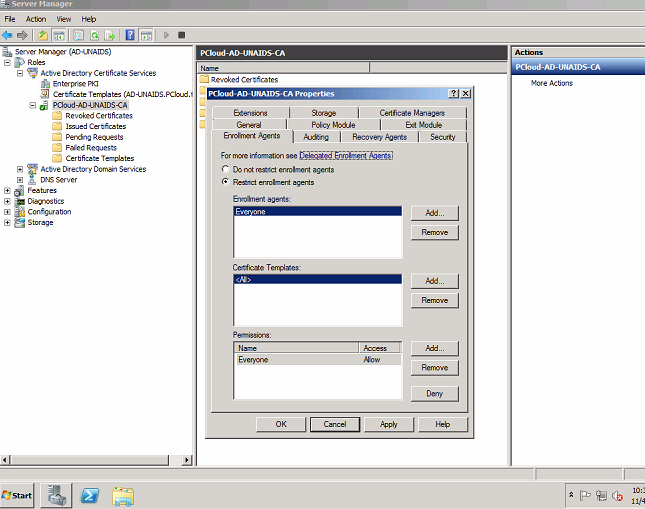
Bước 6. Kiểm tra cấu hình CA server
image
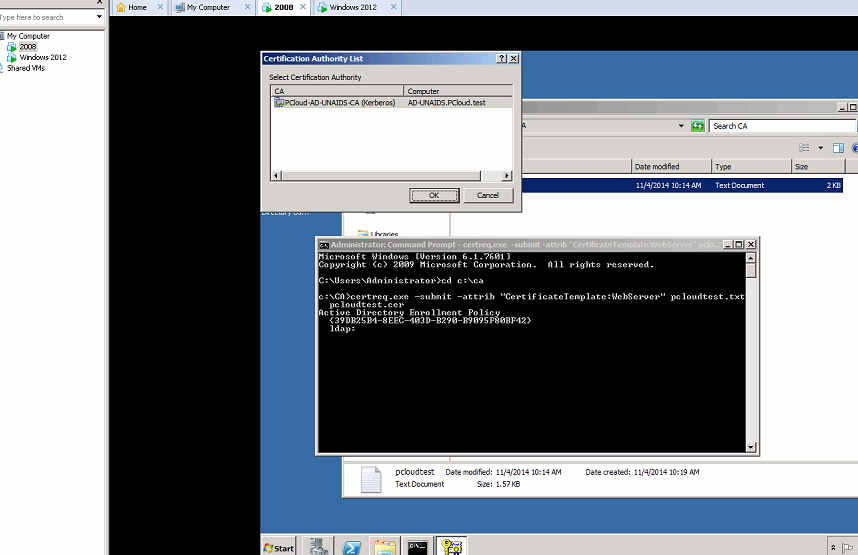
Bước 7.  Dùng cmd chạy lệnh xác thực và tạo file chữ ký (đay là do lỗi phân quyền tự động duyệt chữ ký số)
image
certreq.exe
Bước 8. Mở lại Windows 2012, mở cmd và gõ lệnh mmc > chọn Certificate Authenticate:
image
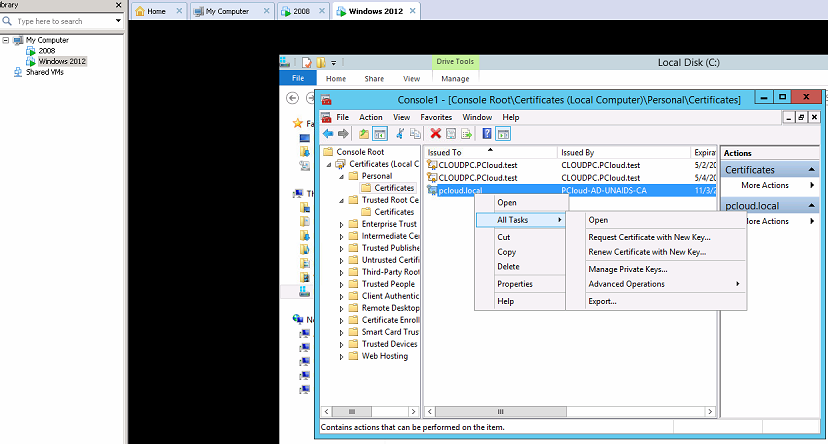
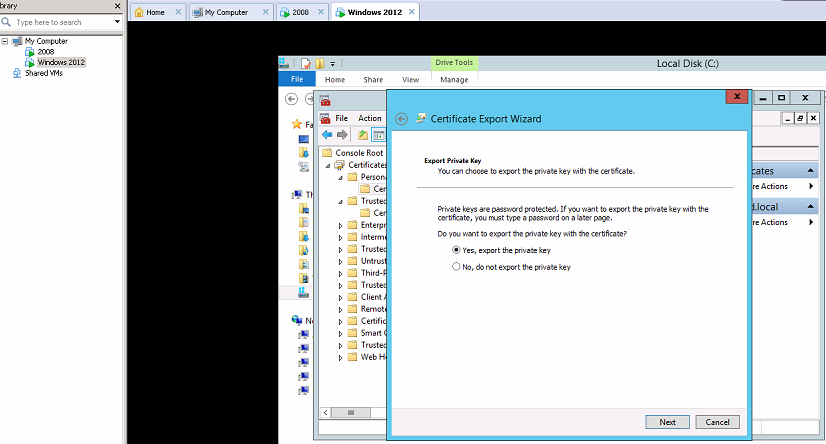
Bước 9. Chọn mục Personal > chọn chữ ký số đã ký > bấm phải chuột chọn menu : Export…
image
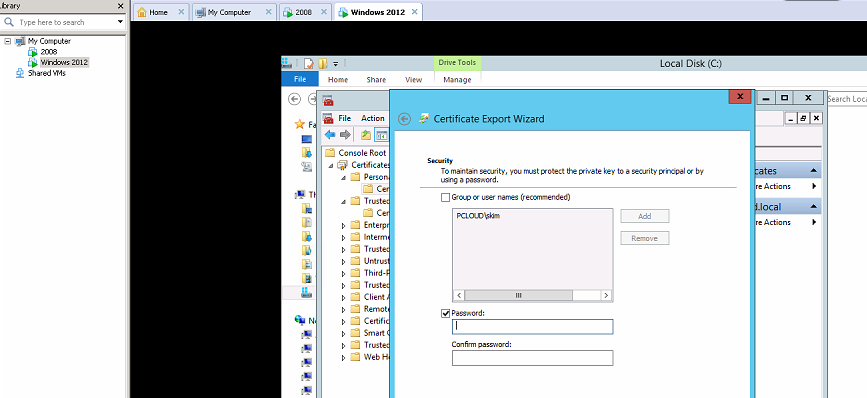
Bước 10. Cài mật khẩu
image
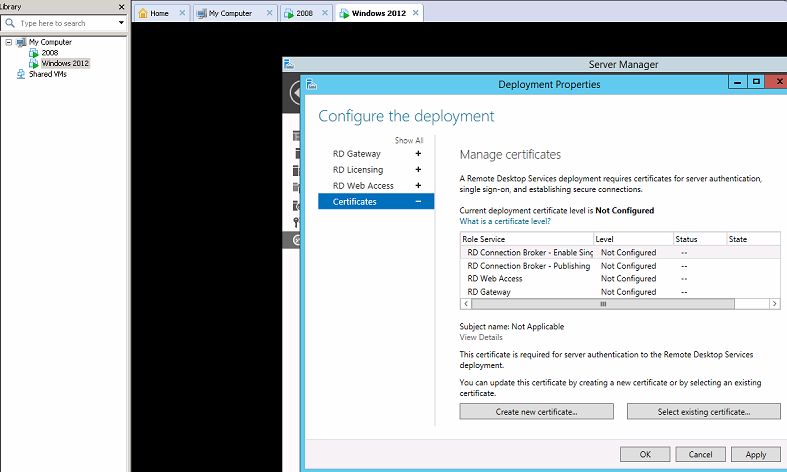
Bước 11. Cấu hình chữ ký số cho các dịch vụ
image
Bước 12. Sau khi cài các chũ ký số
chúng ta có thể tiến hành publish các Application qua RD Broker Publish service bình thường
image
Bước cuối:
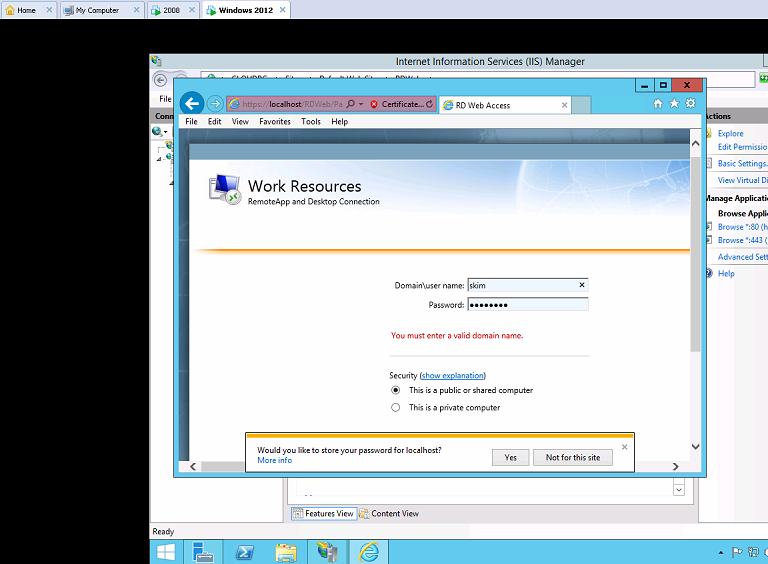
Chạy trình duyệt test, phần lớn trường hợp ở đây bị lỗi, cách tốt nhất là khởi động lại máy chủ Windows 2012 và kiểm tra màn Dashboard xem có dịch vụ nào không chạy (báo đỏ)
hãy vào các mục service lỗi đó và bấm chuột phải chọn Start để các dịch vụ đó chạy lên hết, rồi hẵng vào IE/Chrome/FF và test lại trang RemoteFX
image

Chúc các bạn thành công  !
nguồn: https://thangletoan.wordpress.com/2012/11/20/phan-chua-duoc-cng-bo-cau-hnh-ca-cho-ssl-trn-my-chu-remotefx/
http://www.slideshare.net/laonap166/cu-hnh-ca-cho-ssl-trn-my-ch-remotefx

September 29, 2016

Delegating Control of an Organizational Unit in Windows server 2008


How can I increase the number of PCs a specific user can join to a domain?

  1. Open the ADSI Edit MMC snap-in and connect to the Domain Naming Context.
  2. Right-click on the domainDNS object for the domain you want to change and select Properties.
  3. Edit the ms-DS-MachineAccountQuota attribute and enter the new quota value.
  4. Click OK twice.


September 28, 2016

GPO - How to Detect Who Unlocked a User Account in Active Directory

1. Run gpedit.msc → Create a new GPO → Edit it: Go to "Computer Configuration" → Policies → Windows Settings → Security Settings → Advanced Audit Policy Configuration → Audit Policies → Account Management:
  • Audit User Account Management → Define → Success and Failures.
2. Go to Event Log → Define:
  • Maximum security log size to 4gb
  • Retention method for security log to "Overwrite events as needed".
3. Link the new GPO: Go to "Group Policy Management" → Right-click domain or OU → Choose Link an Existing GPO → Choose the GPO that you created.
4. Force the group policy update: In "Group Policy Management" right click on the defined OU → Click "Group Policy Update".
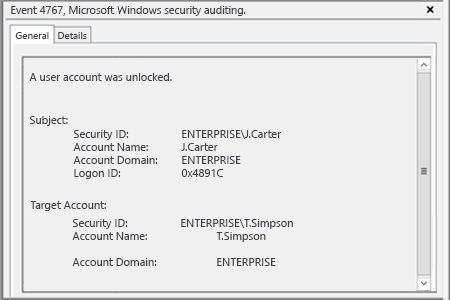
5. Open Event Viewer → Search security log for event ID 4767 (A user account was unlocked).


Reference: http://social.technet.microsoft.com/wiki/contents/articles/32929.how-to-detect-who-unlocked-a-user-account-in-active-directory.aspx

September 27, 2016

Active Directory User Logon Time and Date

This post explains where to look for user logon events in the event viewer and how we can write out logon events to a text file with a simple script.
Domain Controller
To view AD user logon times, set ‘Audit Logon events’ to ‘Success’ in the Default Domain Controllers Policy. When a user logs on you will receive the Event ID 540 (2003) or Event ID 4624 (2008) in the security log of the logonserver used.
Server 2003
Event ID 540
Server 2008
EventID 4624 DC
Computer
Again, ‘Audit Logon events’ needs to be set to success, you can do this in the Default Domain Policy. When a user logs on you will receive the Event ID of 528 (XP) or Event ID 4624 (W7) in the security log of the local computer.
XP
Event ID 528
Windows 7
EventID 4624 W7
Write Logons to Text File
This is a nice method for quickly viewing and searching for a User logon event within a single text file. Create a logon script and apply this to all users in your domain.

@ECHO OFF
echo %logonserver% %username% %computername% %date% %time% >> \\server\share$\logon.txt
exit
This outputs the logonserver (server the user authenticated against), username, computername, date and time to a file called logon.txt. This method isn’t particularly secure, as users will need to have the permissions to write to the file, you can put it in a hidden share like I have done above which adds a slight level of security (by obscurity), but it’s something to be aware of.
Now you can open this single file and view all user logons. You could do the same for logoff if is you so desired.
Logon.txt
Brucey Bonus
If you’d like to view the ‘live update’ of this text file you can use an application called Tailme. This polls updates and adds them to a new line, quite handy if you are looking for a particular user to logon or if you want to see if that user has really restarted their machine…
You can set it to sit in the tray and a single click will bring it up. Here is the config I use.
Tailme Logon

Reference; https://blog.thesysadmins.co.uk/active-directory-user-logon-time-and-date-2.html