March 25, 2016

Windows Server Backup 2008 part 1

Windows Server Backup 2008: Sử dụng để back up và restore file, folder, volume

  1. Cài đặt Windows Server Backup Features

Vào Server Manager, chọn Features > Add Features, chọn Windows Server Backup Features và thực hiện cài đặt.


2. Thực hiện backup data

Vào Windows Server Backup


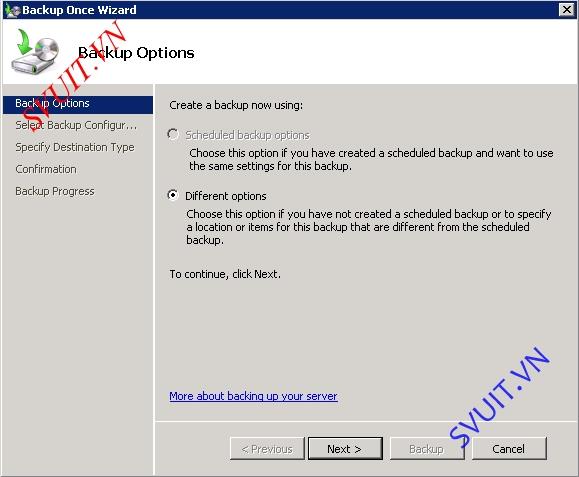
Vào Action > Backup once


Chọn Different options nếu không muốn backup theo lịch


Chọn Custom để thực hiện backup từng phần


2.1. Backup Folder

Chọn thư mục cần backup, sau đó chọn Next


Chọn thư mục đích để copy dữ liệu. Ở đây, chọn copy đến một thư mục share trên mạng, chọn Remote shared folder


Trỏ đường dẫn đến thư mục đích, chọn Inherit 


Sử dụng user/password có quyền truy cập đến thư mục đích


Thực hiện Backup


Quá trình backup được thực hiện và hoàn thành


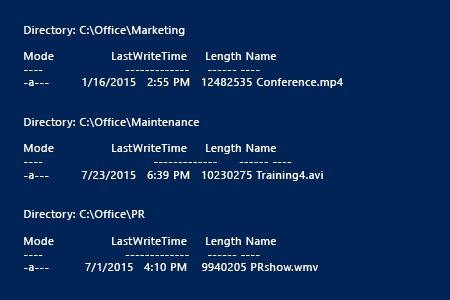
Kiểm tra các file backup vừa tạo ra


2.2. Backup volumes

Thực hiện tương tự quá trình backup như trên, chọn volumes cần backup


Quá trình backup volume hoàn thành


nguồn: http://svuit.vn/lab-server-2003-2008-82/lab-windows-backup-server-2008-part-1-a-988.html

http://www.slideshare.net/laonap166/windows-backup-server-2008-part-1

Multiusers remote desktop windows server 2008

Có 2 cách thực hiện:
  • Cho 2 user truy cập đồng thời (hoặc 1 user dùng 2 connection)
  • Cho nhiều user truy cập đồng thời (nhiều user nhiều connection)


1. Cho 2 user truy cập đồng thời
Vào Run, gõ Regedit
Vào HKEY_LOCAL_MACHINE\SYSTEM\CurrentControlSet\Contro l\ Terminal Serverchuột đôi vàofSingleSessionPerUser, tại value data thay đổi từ giá trị 1 (1 user) sang giá trị 0 (2 user)
Kết nối được tối đa 2 connection
2. Cho nhiều user truy cập đồng thời
Cài đặt Role Remote Desktop Services, mặc định sẽ cho dùng miễn phí 120 ngày

Cài đặt Remote Desktop Session Host
Chọn chứng thực bằng NLA hoặc không
Chọn Configure later
Chọn User, nhóm User được cho phép truy cập Remote Desktop đến Server
Chọn Next
Cài đặt Role. Sau khi quá trình cài đặt hoàn thành, Restart lại Server

Kết nối được nhiều connection

Chú ý: Sau khi hạn dùng 120 ngày kết thúc, thực hiện xóa registry lưu thời gian sử dụng Remote Desktop Services để renew thời gian sử dụng RDS 

Vào KEY_LOCAL_MACHINE\SYSTEM\ CurrentControlSet\Control\ Terminal Server\RCM\GracePeriod,xóa L$RTMTIMEBOMB


Chọn Yes để xác nhận
Nếu không có quyền xóa registry, thông báo lỗi sẽ xuất hiện

Lúc này, cần cho phép quyền xóa registry này cho user bằng cách, chuột phải 
GracePeriod chọn Permission,add thêm user Administrator vào mục Group or user name, chọn quyền Full Control


Sau đó thực hiện xóa L$RTMTIMEBOMB

Sau đó restart lại dịch vụ RDS, chúng ta sẽ có lại 120 ngày sử dụng RDS multiuser


Kiểm tra
Chỉnh lại thời gian của hệ thống quá 120 ngày

Tắt chế độ đồng bộ thời gian từ Internet


Remote Desktop không thực hiện được do quá ngày sử dụng


Đăng nhập local vào máy server, xóa registry như đã hướng dẫn ở trên

Vào 
Services của Windows

Stop các Services Remote Desktop đang chạy như hình vẽ, sau đó Start các Services này lên lại


Remote thành công vào server, có thông báo gia hạn số ngày sử dụng Remote Desktop Services


Nguồn: http://svuit.vn/lab-server-2003-2008-82/lab-multiusers-remote-desktop-windows-server-2008-a-986.html

[error] Windows cannot delete object LDAP

Và nó báo lỗi bạn không thể xóa object này “Windows cannot delete object LDAP://DC01…… because: Access is denied


- Khi bạn join 1 server vào một domain controller. Tuy nhiên, vì một lý do nào đó server này không sử dụng nữa. Bạn muốn xóa tên server này trên domain controller để server khác muốn join lại vào Domain có thể sử dụng tên mà bạn xóa.

- Nhưng kho xóa Computer name của Domain member server này chúng ta sẽ gặp lỗi và nó không thể xóa được.
- Bây giờ mình sẽ thử xóa computer name Mai-Ex trong Active Directory của mình


- Check vao check box và thực hiện delete domain name này.


- Và nó báo lỗi bạn không thể xóa object này “Windows cannot delete object LDAP://DC01…… because: Access is denied”.


Để xóa computer name của domain member ra khỏi Active Directory chúng ta sử dụng ADSI edit để xóa.
Vào menu “Tools → ADSI Edit” và xóa computer name của Domain Member cần xóa.


- Chọn Computer name cần xóa, như vậy là xong.


Nguồn: http://svuit.vn/lab-server-2012-81/error-windows-cannot-delete-object-ldap-1101.html

March 4, 2016

GPO - Turn off Office 2010 Protected View with Group Policy

Introduction

Had a fun time trying to work out how to disable Protected View with Group Policy. While it was staring me in the face and I was being a little silly there are lots of settings and a few ways of doing it.
This was worked for me and stopped all files being opened in protected view, this may not be right for your network if you have a strong security policy as any file downloaded from the internet would open without protected view.
This was needed for us with lots of files being uploaded and downloaded from out client sites we host.

Steps (6 total)

1

Open Group Policy Editing

And find the policy you want to edit, as a general rule don't edit the default policy. Create your own.
If you don't know much about group policy checkout other how to's and online bits about how to setup your own policy. It can break your whole network (yes thats from experience)
2

Download the ADM templates

http://shink.in/70dB4
Extract the files to somewhere safe that you can reference again later if needed.
3

Add the template into the group policy into user configuration

You can do this by:
User configuration
Right click Admin templates
Add/Remove template
Add
Point it at the templates you downloaded
Ok
Close
Ta-Da
4

Turn off protected view

Navigate into the new template will be called Microsoft Word 2010
Word Options
Security
Trust Center
Protected View
Disable - Open files on local intranet UNC in protected view
Enable - Do not open files in unsafe locations
Enable - Do not open files from internet zone
Enable - Turn off protected view for attachments opened from outlook
5

Do the same for excel and powerpoint

Its in the same place as above (well other than being called excel or powerpoint)
6

Run a GP update

and your done!

Conclusion

This is how i fixed the issue of protected view on my network it may not be the right way and it may not do what you want it to but works perfect for me and how my network needs it to :-)
Source: https://community.spiceworks.com/how_to/3687-turn-off-office-2010-protected-view-with-group-policy
Summary: 
The Protected View settings are specific to each application in Office (Word, Excel and Powerpoint only), and to each year (2010 and 2013 only).
Grab the ADMX templates, install them to the PolicyDefinitions folder for the domain, or add them individually to a GPO in Group Policy Management.
The settings are in: User Configuration, Policies, Administrative templates, Microsoft $PRODUCT $YEAR, $PRODUCT Options, Security, Trust Center, Protected View, "Do not open files in unsafe locations in Protected View", Enable.

February 15, 2016

Report List of all user accounts with passwords that are set to never expire in windows server 2012

1. Open PowerShell ISE → Run the following PowerShell script:
Import-Module ActiveDirectory
Search-ADAccount -PasswordNeverExpires | Select-Object Name,ObjectClass,PasswordNeverExpires | Export-Csv c:\temp\
users_password_expiration_false.csv
2. Choose a location to save a .csv file.
3. Open a generated .csv file in Microsoft Excel.
Report example:


reporting on the owners of largest files windows server 2012

1. Open Powershell ISE on your file server → Navigate to your file share using "cd" command → after that run the following powershell code:
gci -re -in * |
  ?{ -not $_.PSIsContainer } |
  sort Length -descending |
  select -first 25
2. After that you will see the top 25 largest files on your shared drive. Copy and paste this information into "txt" or "doc" file.