September 22, 2016

GPO - How To Configure Legal Notices On Domain Computers Using Group Policy

How To Configure Legal Notices On Domain Computers Using Group Policy – Few years ago when i was working on Windows Server 2008 R2, I was told by my manager to configure a logon banner. What came to my mind was to write a script for it and run the script at logon. There are 2 ways to configure legal notices on domain computers, you can configure it by writing a script and executing it at the logon or configuring legal notice using a group policy. I believe the second method is very easy. You can configure Windows Server to display a message to users when they log on. You can use the message display functionality to personalize the logon process, provide news or information, and for other similar purposes. The message appears after the user presses CTRL+ALT+DEL and disappears after the user clicks OK.
In this post we will see on how to configure legal notices on domain computers using group policy. We will create a group policy, modify the policy settings and link it to the domain. I am configuring this policy on a domain controller running Windows server 2008 R2 SP1 edition.
Login to the domain controller machine with the administrator account. Click on Start, Click on Administrative Tools, Click on Group Policy Management. Under Domains, right click your domain and click on Create a GPO in this domain, and link it here.

We will create a policy named Logon_Banner. Click on OK.

Right the policy Logon_Banner and click on Edit. On Group Policy Management Editor, click on Computer Configuration, expand Policies, expand Windows Setttings, expand Security Settings, expand Local Policies, click on Security Options.

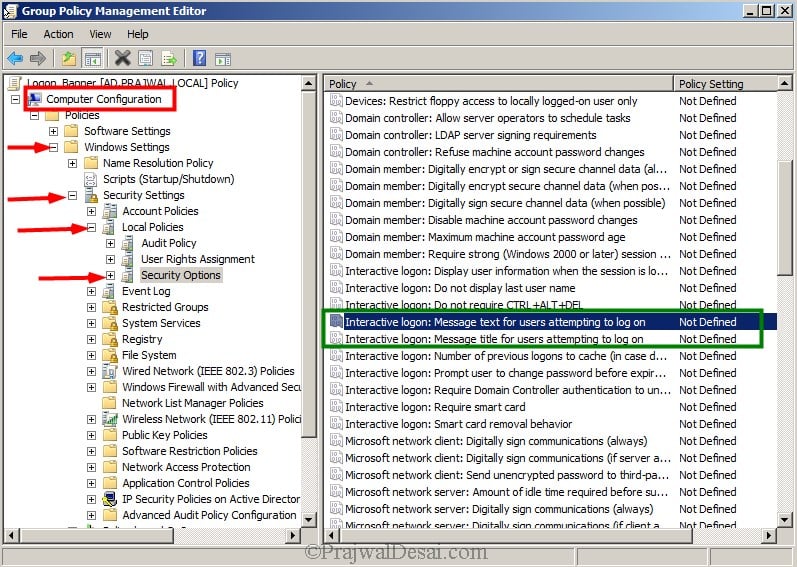
On the right pane look for the policy Interactive Logon : Message text for users attempting to log on. This security setting specifies a text message that is displayed to users when they log on. You can paste the Logon text that is to be displayed to the users before they log in. Click on Apply and OK.

On the right pane look for the policy Interactive Logon : Message title for users attempting to log on. This security setting allows the title to appear in the title bar of the window that contains the Interactive logon.Type the title text and click on Apply and OK.

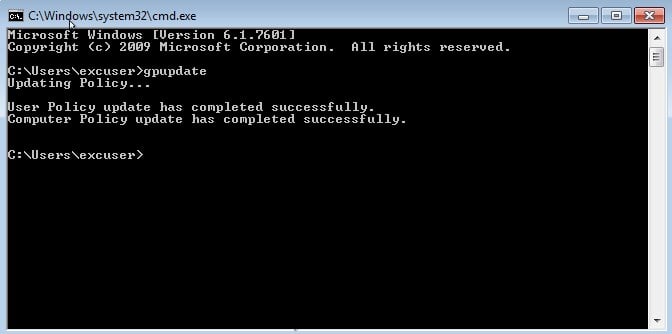
On the client computer open the command prompt and run the command gpupdate.

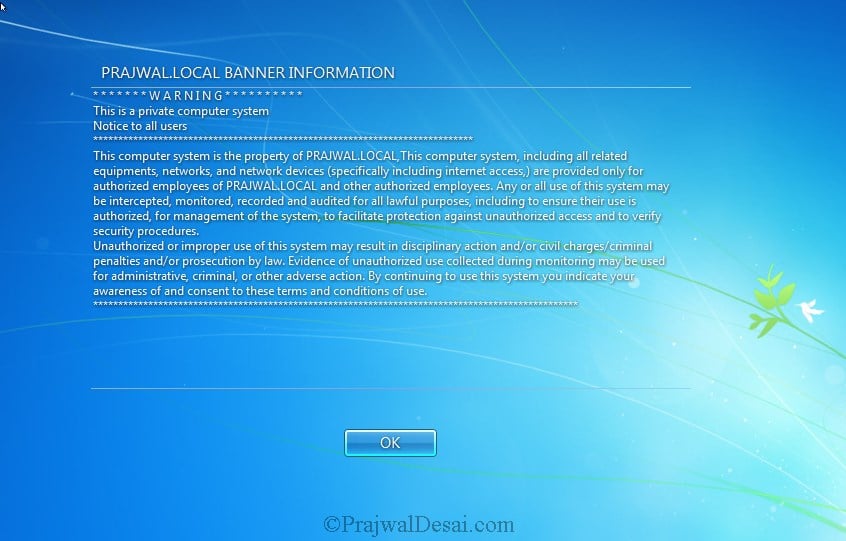
Log off from the client computer. Hold CTRL+ALT and press DEL. You must find the logon banner. Click on OK to login to the computer.

Reference: http://prajwaldesai.com/how-to-configure-legal-notices-on-domain-computers-using-group-policy/

September 19, 2016

Folder Redirection, Roaming Profile Configured in Windows Server 2008 R2


A.Giới Thiệu Về Folder Redirection
Trong hệ điều hành Windows, Desktop, My Documents là một trong số những thư mục hệ thống quan trọng.
Ở các hộp thoại lưu dữ liệu, thư mục My Documents luôn chiếm vị trí “mặt tiền” cực kỳ thuận lợi giúp người dùng lưu nhanh các văn bản. Mặt khác Windows Explorer của bất cứ máy nào cũng đều có một thư mục My Documents tương ứng với tài khoản user khi họ logon. Dữ liệu lưu trong đây được mã hóa ứng với tài khoản user đó, và chỉ có thể được truy xuất bởi chính chủ nhân của tài khoản và administrator. Một vấn đề đặt ra là làm cách nào để bảo đảm thư mục My Documents trên mỗi máy client trong LAN luôn được backup một cách an toàn? Với hệ thống mạng quản lý theo domain, ta có giải pháp là Redirect Folder – hướng Target của tất cả các My Documents trên mỗi máy tính vào thư mục chia sẻ trên máy chủ. Khi đó cho dù máy client có bị hỏng ổ cứng hay cài lại HĐH, thì mọi dữ liệu của người dùng trong thư mục My Documents vẫn sẽ được bảo vệ an toàn.

Sau khi cấu hình Folder Redirection, thư mục My Documents của toàn bộ user sẽ được lưu trên server, giúp họ sử dụng được tài liệu của mình dù có di chuyển sang máy tính khác. Về cơ chế hoạt động và công dụng, Folder Redirection khá giống với tính năng Roaming Profiles. Tuy nhiên, thay vì “đẩy” toàn bộ profile người dùng (gồm thư mục My Documents, Desktop, Application Data ... lên server, Folder Redirection cho phép bạn lựa chọn một thư mục cần”đẩy” (chẳng hạn: thư mục My Documents, Start Menu, App Data, Desktop, tạo sự nhẹ nhàng cho hệ thống.)

  •  Triển Khai
bước 1: Tạo Folder tên Redirection tại ổ C và share full quyền cho everyone


Bước 2: Tạo 1 OU và tạo user thuộc OU đó.
Trong ví dụ này tôi muốn tính năng Folder Redirection chỉ tác động đến OU ITO.


Bước 3run -> gpmc.msc

Kích chuột phải lên ITO chọn Create a GPO in this domain.... và đặt tên là Folder Redirection ==> OK


Chuột phải lên GPO vừa tạo chọn edit, xuất hiện cửa sổ Group Policy Management Editor
Mở User Configuration -> Windows Setting -> Folder Redirection


Bên trong Folder Redirection liệt kê những thư mục có thể dùng được chức năng này, ở bài này tôi muốn Roaming 2 thư mục là Desktop & My documents , Chuột phải lên Documents chọn Properties


Hiển thị bảng Documents Properties
ô Setting chọn Basic - Redirect everyone's folder to the same location
dòng Root path bạn nhập \\SERVER\Redirection Trong đó SERVER là tên máy DC ,Folder Redirection là thư mục ta vừa tạo & Share lúc nãy. Sau đó chọn OK


Làm tương tự với thư mục Desktop.

Bước 4: Từ máy Client ta đăng nhập với Account u1 sẽ thấy thư mục mặc định của  My Documents  \\LT-AD\Redirection\u1


Hoặc ta có thể dùng rsop.msc ở client để kiểm tra


Hoặc ta có thể vô Server truy cập thư mục share để kiểm tra


B. ROAMING PROFILE

  • Sự khác nhau giữa Roaming Profiles và Local Profiles  

Trong môi trường mạng Windows, có những ưu và khuyết điểm liên quan đến việc sử dụng Roaming Profiles và Local Profiles. Ngoài vấn đề bảo mật, còn có vấn đề về mất dữ liệu, file lưu trữ băng thông và một số thứ khác. Trong bài viết này, tôi sẽ trình bày về Roaming Profiles và Local Profiles.

Profile là tổng hợp những dữ liệu đặc thù của một user. Nó bao gồm các dữ liệu như Favorites của IE, bookmark của Firefox, Outlook settings, và nhiều thứ khác. Windows được thiết kế để lưu dữ liệu của người dùng tại một địa điểm, giống như trên ổ cứng hoặc trên một server. Khi bạn logon và máy tính, nó sẽ tải dữ liệu trong profile của bạn kể cả những phần mềm được thiết lập để khởi động cùng windows.

Roaming Profiles là dạng profiles của người dùng được lưu trữ trên một server, nó sẽ được tải về máy tính bất cứ khi nào người dùng login. Theo cách này, người dùng có thể truy nhập đến thông tin và những thiết lập của họ mà không phụ thuộc vào máy tính mà họ đăng nhập. 

Local Profiles là dạng profiles được lưu trữ trực tiếp trên một máy tính, và rất ít dữ liệu được chuyển giữa PC và server khi họ logon vào.

Ưu điểm của Roaming Profile là nó sẽ tự động backup dữ liệu của người dùng đến server mỗi khi log out. Người dùng có thể đăng nhập trên nhiều máy tính mà vẫn dữ được những thiết lập của mình, điều này rất tốt trong môi trường mà mọi người làm việc không trên một máy tính cố định, chẳng hạn như một phòng lab.

Nhược điểm của Roaming Profile : khi người dùng đã logon , một bản sao của profiles của họ sẽ được lưu lại trên máy tính mà học đăng nhập, điều này tạo ra vấn đề về bảo mật. Thời gian đăng nhập cũng là một vấn đề, nếu người dùng đặt quá nhiều dữ liệu trong profiles của họ, có thể sẽ phải chờ đợi rất lâu khi đăng nhập hoặc tắt một máy tính. Kèm theo đó với profiles lớn còn chiếm nhiều băng thông để truyền dữ liệu qua lại, phần lowin trong số này là lượng băng thông bị lãng phí bởi nhiều tập tin và dữ liệu được tải đồng bộ tuy nhiên người dùng lại không dùng đến.

Còn về Local Profiles, ưu điểm chính của nó là thời gian đăng nhập vào máy tính nhanh hơn, vì dữ liệu được lưu trữ trực tiếp trên máy tính đó,  tuy nhiên người dùng lại không thể truy nhập profiles của họ khi đăng nhập trên một máy tính khác. Điều đó cũng có nghĩa là thiết lập cá nhân của người dùng sẽ bị mất, khi máy tính cá nhân của họ không còn làm việc.


  • Triền Khai


September 16, 2016

Zabbix server is not running: the information displayed may not be current.


when checked log file /tmp/zabbix_server.log show below:

  1365:20160916:132743.845 Starting Zabbix Server. Zabbix 3.0.0beta1 (revision 57867).
  1365:20160916:132743.845 ****** Enabled features ******
  1365:20160916:132743.845 SNMP monitoring:           YES
  1365:20160916:132743.845 IPMI monitoring:           YES
  1365:20160916:132743.845 Web monitoring:            YES
  1365:20160916:132743.845 VMware monitoring:         YES
  1365:20160916:132743.845 SMTP authentication:        NO
  1365:20160916:132743.845 Jabber notifications:       NO
  1365:20160916:132743.845 Ez Texting notifications:  YES
  1365:20160916:132743.845 ODBC:                      YES
  1365:20160916:132743.845 SSH2 support:              YES
  1365:20160916:132743.845 IPv6 support:              YES
  1365:20160916:132743.845 TLS support:               YES
  1365:20160916:132743.845 ******************************
  1365:20160916:132743.845 using configuration file: /usr/local/etc/zabbix_server.conf
  1365:20160916:132743.949 [Z3001] connection to database 'zabbix' failed: [2002] Can't connect to local MySQL server through socket '/tmp/mysql.sock' (2)


Fixed:

#ln -s /var/lib/mysql/mysql.sock /tmp/mysql.sock
#service mysqld restart

Reference: http://stackoverflow.com/questions/4448467/cant-connect-to-local-mysql-server-through-socket-var-lib-mysql-mysql-sock


Upgrading MySQL 5.3 to 5.6 MySQL Daemon failed to start (CentOS 6)


Operating System: CentOS 6.8
Arch : x86_64
Symptom MySQL service failed to start after upgrading from MySQL 5.3.3 to 5.6 version.
Given below is the error found after upgrading to MySQL server version 5.6 from 5.3. You can get the below error in MySQL error log file.

2014-11-29 02:22:56 2175 [ERROR] InnoDB: auto-extending data file ./ibdata1 is of a different size 640 pages (rounded down to MB) than specified in the .cnf file: initial 768 pages, max 0 (relevant if non-zero) pages!
2014-11-29 02:22:56 2175 [ERROR] InnoDB: Could not open or create the system tablespace. If you tried to add new data files to the system tablespace, and it failed here, you should now edit innodb_data_file_path in my.cnf back to what it was, and remove the new ibdata files InnoDB created in this failed attempt. InnoDB only wrote those files full of zeros, but did not yet use them in any way. But be careful: do not remove old data files which contain your precious data!
2014-11-29 02:22:56 2175 [ERROR] Plugin ‘InnoDB’ init function returned error.
2014-11-29 02:22:56 2175 [ERROR] Plugin ‘InnoDB’ registration as a STORAGE ENGINE failed.
2014-11-29 02:22:56 2175 [ERROR] Unknown/unsupported storage engine: InnoDB
2014-11-29 02:22:56 2175 [ERROR] Aborting
Solution :
To solve this problem add the below given line in /etc/my.cnf file inside [mysqld] block.
innodb_data_file_path = ibdata1:10M:autoextend
Now restart the mysql service.
service mysqld restart
I hope the issue is resolved for you also.

September 15, 2016

September 13, 2016

How to Install PHP 5.4, 5.5 or 5.6 on CentOS 6 and CentOS 7


Repo Installation
SSH connection to your server and run the following commands 
For CentOS 7 (including EPEL install)


#wget http://dl.fedoraproject.org/pub/epel/7/x86_64/e/epel-release-7-5.noarch.rpm
#wget http://rpms.famillecollet.com/enterprise/remi-release-7.rpm
#rpm -Uvh remi-release-7*.rpm epel-release-7*.rpm
If you already have EPEL installed:


#rpm -Uvh remi-release-7*.rpm
For CentOS 6 (including EPEL install)


#rpm -Uvh remi-release-6*.rpm epel-release-6*.rpm
If you already have EPEL installed:


#rpm -Uvh remi-release-6*.rpm
Enabling the Repo
# vi /etc/yum.repos.d/remi.repo.
We need to make sure that the first section [remi] is enabled:


[remi]
name=Les RPM de remi pour Enterprise Linux 6 - $basearch
enabled=1
gpgcheck=1
If we want PHP 5.5 or PHP 5.6 we need to do a bit more work, further down in the repo.repo file you will see two additional sections [remi-php55] and [remi-php56], decide which PHP version you want to install and then enable the correct. So for PHP 5.6 we would change to:


[remi-php56]
name=Les RPM de remi de PHP 5.6 pour Enterprise Linux 6 - $basearch
# WARNING: If you enable this repository, you must also enable "remi"
enabled=1
gpgcheck=1
Once you made your changes save your modified file and quit your editor.
Installing PHP


#sudo yum -y install httpd mysql mysql-server mysql-devel php php-mysql php-fpm
#service httpd restart
#php-v


Enjoyed!

September 10, 2016

How to force Google Safe Search - Microsoft AD DNS

Forcing safe-search for Google is very simple, and pretty hard to turn off. Couple it together with filtering DNS queries and you’ve got yourself a pretty robust content filter.
First I’m going to show you the powershell way, then I will show you the GUI way.

add-dnsserverprimaryzone -ReplicationScope Forest -Name www.google.com -Verbose
Add-DnsServerResourceRecord -DName -ZoneName www.google.com -name "@" -DomainNameAlias forcesafesearch.google.com -Verbose
Add-DnsServerResourceRecordA -IPv4Address 216.239.38.120 -name "@" -ZoneName www.google.com -Verbose
As you can see the powershell way is the preferred method.
Here’s how to do it the GUI way:
Open up AD DNS or just type dnsmgmt.msc in a RUN box.
Add a new primary zone, replicated to the whole forest for “www.google.com”
Now go to the zone, and create a A record pointing to “216.239.38.120”.
Now right click and create ” other new records…” we’ll select DNAME.
Now add “forcesafesearch.google.com” as the FQDN, leave alias name blank.
Now flush your DNS and test it out!


if we try to turn safesearch off via the settings, it does not work!!!
Same result.


Enjoy.

References: http://techstat.net/microsoft-ad-dns-how-to-force-google-safe-search/


http://www.slideshare.net/laonap166/how-to-force-google-safe-search

September 8, 2016

HOW TO BACKUP AND RESTORE NTFS AND SHARED FOLDER PERMISSIONS


HOW TO BACKUP AND RESTORE NTFS AND SHARED FOLDER PERMISSIONS

To backup & restore NTFS permission you will find many utilities like NTBACKUP,  iCacls, Robocopy and FSMT.
Backup and Restore of Shared Permissions:
Generally, shared folder permissions are stored in registry at the following location.
HKLM\SYSTEM\CurrentControlSet\Services\LanmanServer\Shares,
you need to backup and restore this key values using export and import options.
Step 1: Open the registry ( Run | Regedit.exe )
Step 2: Navigate to the following location:
 HKLM\SYSTEM\CurrentControlSet\Services\LanmanServer\Shares
Step 3: Right Click on Shares Registry key in the Left pane, from context menu select Export.
Step4: Give the filename as shareperms.reg

When you want to restore the permissions, copy shareperms.reg file and paste to another server where you want to restore and then double click on that file to import.

USING COMMAND LINE UTILITY.
reg export HKLM\SYSTEM\CurrentControlSet\Services\LanmanServer\Shares c:\shareperms.reg
If you need to restore, copy and paste the file to C: location, just run:
reg import c:\shareperms.reg

Note: After restore you need to restart the Server service.
net stop lanmanserver
net start lanmanserver

BACKUP AND RESTORE OF NTFS PERMISSIONS

If your are using NTBackup to restore the data, you should select the checkbox to restore permissions as well.
Using icacls command to backup NTFS permissions:
icacls d:\sharedata /save ntfsperms.txt /t /c
The /T switch allows it to get subfolder permissions too. The /C switch allows it to continue even if errors are encountered (although errors will still be displayed).
Use this command to restore them:
icacls d:\ /restore ntfsperms.txt


August 26, 2016

4 Easy Ways to to Check If Your Processor Supports Virtualization


Running multiple operating systems on a computer is something all tech enthusiasts enjoy doing. You can do this by installing the operating system to a separate hard disk partition or as a virtual machine. Installing an operating system as a virtual machine is more advantageous because you don’t have to constantly restart your computer to access the other OS.
However in order to create a virtual machine, your processor must support virtualization. Fortunately, there are many tools that enable you to check if your CPU or processor supports hardware virtualization.
Using CMD in windows
Press windows + R to open Run dialog type cmd
in cmd type: systeminfo ==> press Enter
Free Tools from AMD and Intel:
Intel and AMD are two of the most prominent PC processor providers in the world. Both of them provide tools for you to check if your processor has virtualization support. In order for this to work, you processor must match the tool. For example if you have an AMD processor, you need to download the AMD Virtualization Compatibility tool.
To check what type of processor you have, click the “Start” button.
Click Start
Right-click “Computer” and select “Properties.”
Click Properties
 Under “System,” you will see the name of your processor. As you can see in the image below, this computer has an Intel processor.
Processor Name
 This is the main window of the Intel Processor Identification utility.
Intel Processor Identification
To check if your PC supports virtualization, click the “CPU Technologies” tab. Search for the“Virtualization Technology” section to determine if your processor supports virtualization.
CPU Technologies

Intel Virtualization Check

Securable:

Securable is a very easy to check if you processor has virtualization support, because it requires no installation. All you have to do is run the executable (.exe) file. Right-click the file you have downloaded, and select “Run as administrator.”
Securable
It will then show you if your processor supports virtualization.
Securable Virtualization

Hardware-Assisted Virtualization Detection Tool:

In order to take advantage of features such as Windows XP Mode, your processor must support virtualization. Microsoft provides users the Hardware-Assisted Virtualization Detection Tool to help users determine if their processor supports virtualization.
Hardware Assisted Virtualization Detection Tool
Like securable, this program requires no installation. All you have to do is double-click the executable file, and it will tell whether or not your processor supports virtualization. As you can see in the image below this processor doesn’t support virtualization.

Final Thoughts:

In some cases, virtualization is disabled by the default BIOS settings. If you know your CPU model supports virtualization, you need to enable it from your BIOS settings. If your processor does not support virtualization at all, you can trying buying a new processor or new computer. The computer in which tests were performed doesn’t support virtualization. yet, it is still able to run Windows XP Mode and live CDs with independent operating systems.
You can always try using basic virtual machines such as live CDs, Windows XP Mode, etc. However, you will need virtualization for more robust systems such as Windows 7 and 8.

Reference: http://www.technorms.com/8208/check-if-processor-supports-virtualization